
Table of Contents
Ever dream of pulling a warm, crusty loaf of long french roll bread from your own oven? The kind that makes your kitchen smell incredible and tastes even better? Forget those flimsy store-bought rolls; we're talking about real, homemade goodness. This isn't some overly complicated baking saga, either. We're breaking down the process into simple steps, so even if you're new to bread making, you can totally nail it. We'll start with the basics, the dough, then move to shaping those beauties, get them baked just right, and finally, how to best enjoy your creation. This guide is your ticket to mastering the art of baking long french roll bread. Get ready to impress your friends, family, and most importantly, yourself. You might even find yourself making a batch every week, just because you can. Let's get baking!
Crafting the Perfect Long French Roll Bread Dough

Crafting the Perfect Long French Roll Bread Dough
The Foundation: Flour Power
Okay, so you want to make killer long french roll bread? It all starts with the flour, my friend. We're not talking about any old flour here. For that classic, slightly chewy texture, you gotta use bread flour. It has more protein than all-purpose, which is what gives the bread that lovely rise and structure. Think of it like the skeleton of your bread – strong and reliable. Don't skimp on it! And if you're feeling fancy, you can throw in a little semolina flour too. It adds a touch of richness and a subtle nutty flavor. It's like giving your bread a secret weapon.
Now, let's get down to the nitty-gritty. Water temperature matters, like, a lot. We want it lukewarm, not too hot, not too cold, just right like Goldilocks' porridge. Too hot and you'll kill the yeast, too cold and it won't wake up. If you want to be super precise, use a kitchen thermometer. But if you're like me, just make sure it feels warm to the touch, like a baby's bath. And don't forget the salt! It's not just for flavor, it also controls the yeast and strengthens the gluten. Without it, your bread will taste flat and sad. So, don't be shy with the salt, but don't go overboard either. We're aiming for balance here, not a salt lick.
Mixing and Kneading: The Heart of the Matter
Alright, now comes the fun part - mixing! You can use a stand mixer with a dough hook if you have one, it makes life easier, but your hands work just fine too. Combine the flour, water, yeast, and salt. At first, it'll look like a shaggy mess, but don't worry, that's normal. Keep mixing until it starts to form a dough, then comes the kneading. This is where you really get to know your dough. It's like a workout for your hands, but the reward is totally worth it. Knead for about 8-10 minutes if you're using a mixer, or 10-12 minutes by hand. You'll know it's ready when the dough is smooth, elastic, and bounces back when you poke it. It's like a living thing, and you're giving it the love it needs to grow big and strong.
Ingredient | Purpose |
|---|---|
Bread Flour | Provides structure and chewiness |
Water | Activates yeast and hydrates flour |
Yeast | Causes the dough to rise |
Salt | Controls yeast and enhances flavor |
First Rise: Patience is Key
Once your dough is kneaded, place it in a lightly oiled bowl, turning to coat. Cover it with plastic wrap and let it rise in a warm place for about 50 minutes, or until it's doubled in size. This is where patience comes in. Don't rush it! The yeast needs time to do its thing. It's like a little magic show happening inside your bowl. When it's ready, it will be puffy and feel airy. It's a beautiful sight to behold. And don't be afraid to give it a little poke – it's so satisfying to watch it deflate. Now you're ready to move on to the next step. Getting closer and closer to that perfect long french roll bread.
Remember, the rise is crucial for that light and airy texture. If you rush it, your bread might end up dense and tough. So, find a cozy spot for your dough, maybe near a sunny window or in a slightly warm oven with the light on. Let it do its thing, and you'll be rewarded with a beautiful, bubbly dough that's ready to be shaped into long french roll perfection.
Shaping and Proofing Your Long French Roll Bread
Shaping and Proofing Your Long French Roll Bread
Dividing and Pre-Shaping
Okay, so your dough has doubled, looking all puffy and ready to go? Awesome! Now, gently punch it down to release the air. Don't be shy, give it a good poke. Then, turn the dough out onto a lightly floured surface. This is where we start to shape our long french roll bread. Divide the dough into four equal pieces. You can use a knife or a dough scraper for this. Then, take each piece and gently form it into a rough ball. This is called pre-shaping. It's like a warm-up for the real shaping. Let the dough rest for about 10 minutes. This makes it easier to shape later. Think of it as giving the gluten a little break.
This resting period is key. It allows the gluten to relax, which means your final loaves will be easier to shape and less likely to tear. It's like letting your muscles recover after a workout. So, cover the dough with plastic wrap and let them chill for a bit. While you're waiting, you can get your baking sheets ready. Line them with parchment paper. This will prevent the loaves from sticking and make cleanup a breeze. It's all about working smarter, not harder.
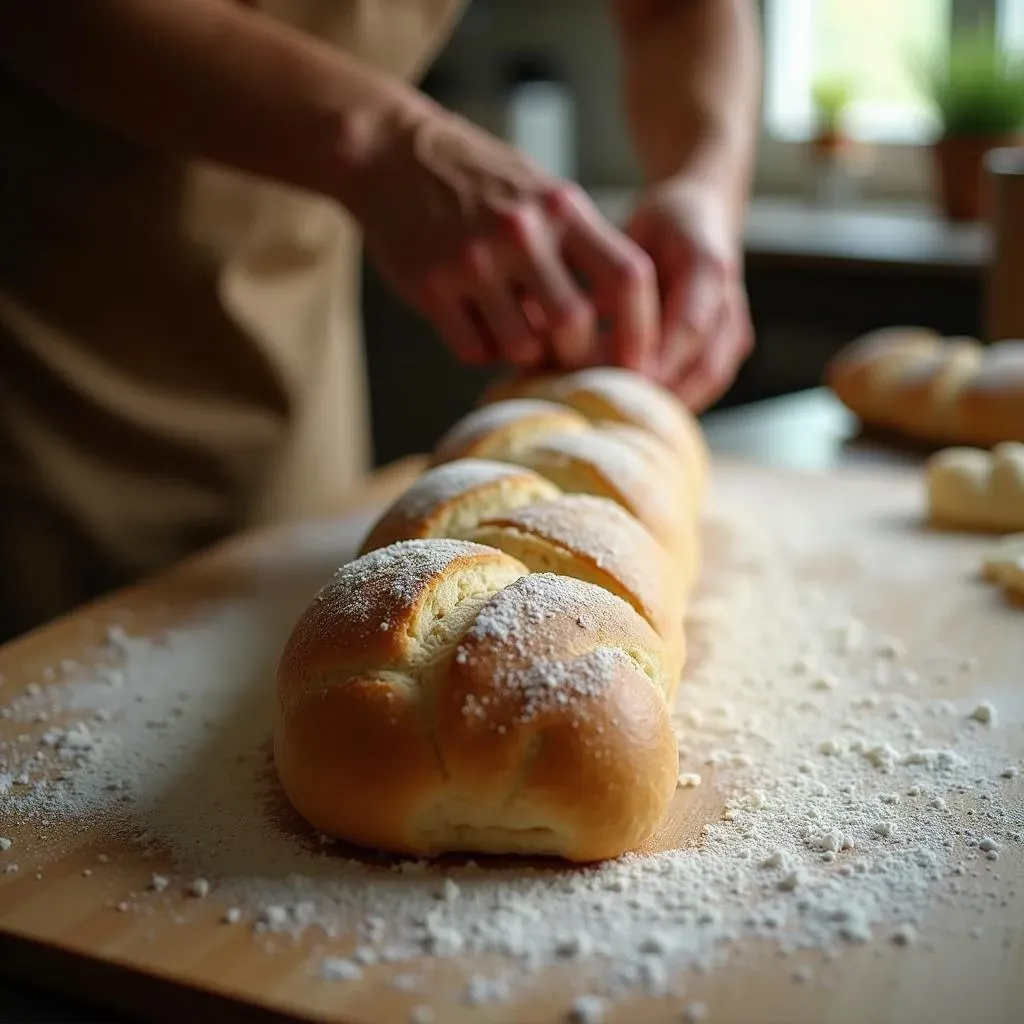
Final Shaping: The Art of the Roll
Now for the fun part: shaping the long french roll bread. Take one of the rested dough balls and gently flatten it into an oval shape. Then, starting from one of the short ends, roll the dough tightly into a log. Pinch the seam to seal it. Repeat with the remaining pieces of dough. You should now have four long, skinny rolls. If you're aiming for a classic baguette shape, try to make the middle a little thicker than the ends. It's all about getting the right look. And don't worry if they're not perfect. Each loaf will have its own unique character. It’s like a little snowflake, but in bread form.
Place the shaped loaves on your prepared baking sheets, leaving some space between them. Now, it's time for the final proof. Cover the baking sheets loosely with plastic wrap and let the dough rise for another 30 minutes. This second rise is crucial for creating that light and airy crumb. It's like the final push before the big bake. And while they rise, you can preheat your oven. We want it nice and hot for that perfect golden crust.
Step | Description |
|---|---|
Divide | Separate the dough into four equal pieces. |
Pre-Shape | Form each piece into a rough ball. |
Rest | Let the dough rest for 10 minutes. |
Shape | Roll each dough ball into a log. |
Proof | Let the shaped loaves rise for 30 minutes. |
The Importance of Proofing
Proofing is like the secret weapon of bread making. It’s not just about letting the dough rise again, it’s about developing flavor and texture. During this second rise, the yeast is working its magic, creating those tiny air pockets that make your bread light and airy. It's like a mini-party happening inside the dough. If you don’t proof long enough, your bread will be dense and heavy. So, don’t rush this step. Let your loaves do their thing and you'll be rewarded with a beautiful, airy crumb.
Also, it's important to slash the top of your long french roll bread. This allows the bread to expand in the oven without tearing. Use a sharp knife or a lame (a special bread-slashing tool) to make a few diagonal slashes along the top of each loaf. This also creates those beautiful patterns on the crust. It's like giving your bread a little haircut before it hits the runway. Now, they're ready for the oven, and you're ready to bake that perfect long french roll bread.
Baking Your Long French Roll Bread to Golden Perfection
Baking Your Long French Roll Bread to Golden Perfection
Oven Prep: Getting Ready to Bake
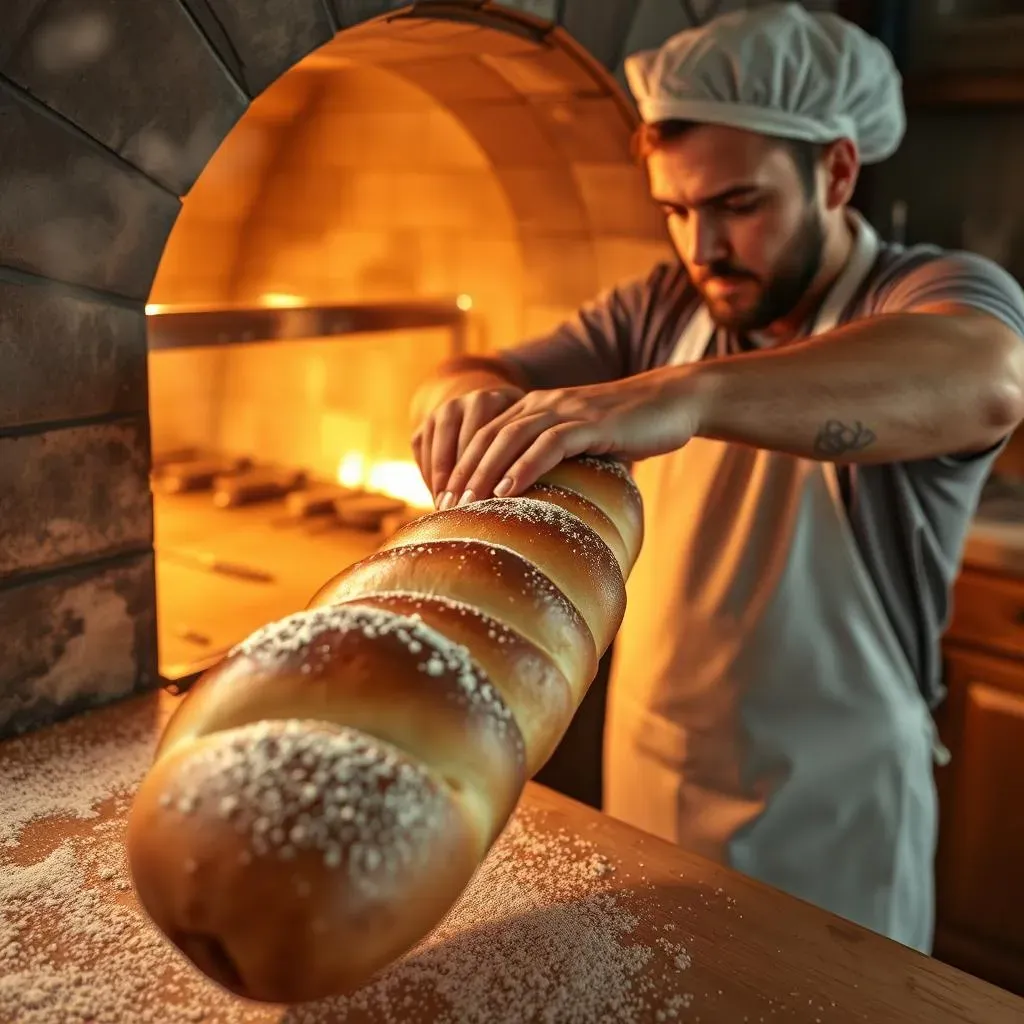
Alright, friend, the moment we've been waiting for is here: baking time! Before you even think about sliding those beautiful loaves into the oven, let's talk about preheating. We need a nice, hot oven, set to 350°F (175°C). Make sure your oven is fully preheated. This is not the time to be impatient. A cold oven will not give you that perfect crust. And if you have a baking stone or a baking steel, get it in there. It helps create that beautiful, even heat. It's like giving your bread a cozy little bed to bake on. If you don't have one, a regular baking sheet will work just fine. It's all about making the most of what you've got.
Now, for that professional bakery touch, we're going to create some steam in the oven. This is crucial for that beautiful, shiny crust. You can do this a few ways. One way is to place a pan of hot water on the bottom rack of your oven. Another way is to spray the oven with water a couple of times during the first few minutes of baking. It’s like a spa day for your bread. The steam helps the crust form properly. It's like the secret ingredient that takes your bread from good to great. So, don't skip the steam, it makes a huge difference.
Baking to Perfection
Okay, the oven is hot, the steam is ready, let's get those long french roll bread loaves in there! Gently slide the baking sheets into the oven, being careful not to burn yourself. Now, we bake for about 25 minutes, or until the loaves are golden brown and sound hollow when you tap on the bottom. This is where you need to trust your instincts. Keep an eye on them, and if they start to brown too quickly, you can lower the oven temperature slightly. The goal is a beautifully golden crust with a soft, airy interior. It's like a work of art, and you're the artist.
Baking Step | Purpose |
|---|---|
Preheat Oven | Ensures even baking and proper crust formation |
Steam | Creates a shiny and crisp crust |
Bake | Cooks the bread until golden brown and hollow |
Once they're done, take the loaves out of the oven and let them cool on a wire rack. This is important because it allows air to circulate around the loaves, preventing them from getting soggy. It's like giving your bread a chance to breathe after a long bake. And while you're waiting, you can admire your handiwork. You've just created something amazing, and the smell alone is enough to make anyone's mouth water. But try to resist the urge to cut into them right away. The bread needs time to cool and set properly. Patience, my friend, patience.
Cooling and Enjoying
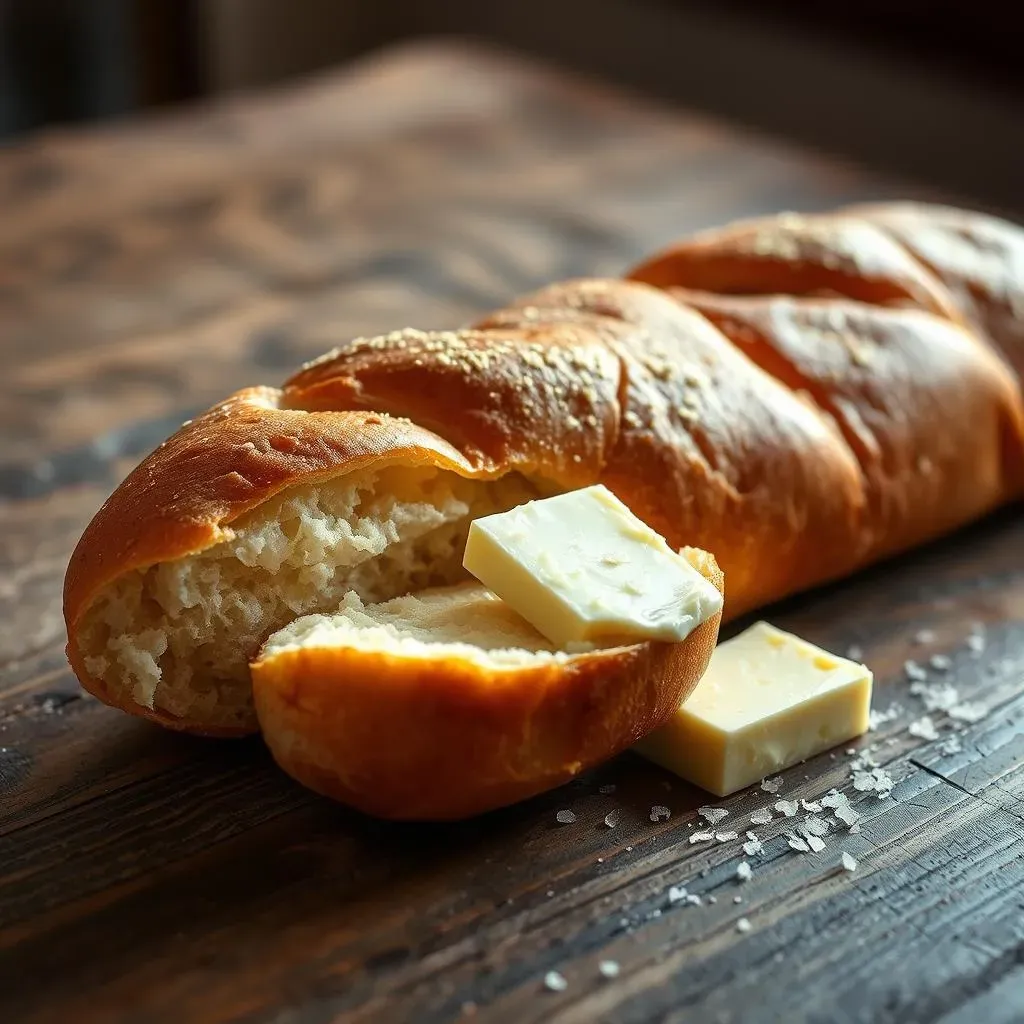
Finally, the long french roll bread is out of the oven, cooled, and ready to be devoured. This is the most satisfying part of the whole process. The first bite of that warm, crusty bread, with its soft, airy interior, is pure bliss. You can enjoy it with butter, jam, or even make a killer sandwich. The possibilities are endless. It's like a blank canvas, ready to be filled with deliciousness. And because you made it yourself, it tastes even better. It's a small victory, but it's one you can savor with every single bite.
And there you have it, my friend! You've successfully baked your own long french roll bread. It's not just about the bread, it's about the experience, the process, and the satisfaction of making something with your own two hands. So, go ahead, share your creation with friends and family, and pat yourself on the back. You've earned it. And who knows, maybe you'll even be inspired to try another bread recipe. The baking world is your oyster!
Enjoying Your Homemade Long French Roll Bread
Enjoying Your Homemade Long French Roll Bread
The Classic Pairings: Simple is Best
Okay, you've baked this beautiful long french roll bread, and it's calling your name. First things first, let's talk about the classics. Sometimes, the simplest things are the best. A generous slather of good quality butter, maybe with a sprinkle of sea salt, is divine. The way the butter melts into the warm, slightly chewy bread is just pure bliss. Or, if you're feeling a little sweet, try it with some homemade jam or preserves. The combination of the crusty bread and the sweet, fruity jam is a match made in heaven. It's like a warm hug for your taste buds. And honestly, sometimes that's all you need. It’s a reminder that the best things in life are often the simplest.
And don't forget about cheese! A good slice of brie or camembert pairs wonderfully with the slightly tangy flavor of the bread. It's a great appetizer for a dinner party, or a satisfying snack for yourself. You can even toast the bread lightly and add some garlic for a simple bruschetta. The possibilities are endless. It's like having a blank canvas, ready to be filled with delicious flavors. So, experiment, have fun, and find your favorite simple pairing. Sometimes, the simplest things are the most satisfying.
Pairing | Why it Works |
|---|---|
Butter | Simple, classic, melts into the warm bread |
Jam/Preserves | Sweet and fruity, complements the bread's tang |
Cheese | Creamy and rich, balances the bread's texture |
Sandwich Sensations: Elevate Your Lunch Game
Now, let's get serious about sandwiches. This long french roll bread is the perfect vessel for creating sandwich masterpieces. Forget those flimsy, store-bought rolls, we're talking about a sturdy, flavorful base that can handle all your favorite fillings. Think about a classic po'boy with crispy fried shrimp, lettuce, tomato, and a generous drizzle of remoulade sauce. Or how about a hearty Italian sub with layers of salami, ham, provolone, and a tangy olive tapenade? The possibilities are endless. It's like having a bread-shaped playground for your culinary imagination.
And don't be afraid to get creative. Experiment with different flavor combinations, try out new spreads, and add some unexpected ingredients. A grilled veggie sandwich with roasted red peppers, zucchini, and a creamy pesto is a great option. Or, for something a bit more exotic, try a Vietnamese banh mi with pickled vegetables, cilantro, and a spicy sriracha mayo. The key is to have fun and create a sandwich that you truly love. It's like making a personalized work of art, and you get to eat it when you're done. So, go ahead, unleash your inner sandwich artist and see what kind of culinary creations you can come up with.
Beyond the Basics: Creative Culinary Adventures
Alright, let’s step outside the usual pairings and explore some more creative ways to enjoy your long french roll bread. How about using it as a base for a delicious bread pudding? The crusty exterior and soft interior soak up the custard beautifully, creating a warm, comforting dessert. Or, you can slice it into thick rounds, toast them up, and use them for crostini or bruschetta. Top them with a variety of ingredients, like roasted tomatoes, garlic, herbs, and a drizzle of olive oil. They’re perfect for appetizers or a light snack. It’s like giving your bread a second life, and it's even better than the first.
And if you're feeling really adventurous, you can try using the bread to make French toast. The slightly chewy texture holds up well to the custard, creating a decadent breakfast treat. Or, you can cube the bread and use it for stuffing or croutons. It’s like a chameleon, adapting to all sorts of flavors and textures. So, don't be afraid to think outside the box and experiment with different ways to enjoy your homemade long french roll bread. The possibilities are limited only by your imagination. So go ahead, explore, create, and most importantly, enjoy the fruits of your labor.
"The smell of good bread baking, like the sound of lightly flowing water, is indescribable in its evocation of innocence and delight." – M.F.K. Fisher