Table of Contents
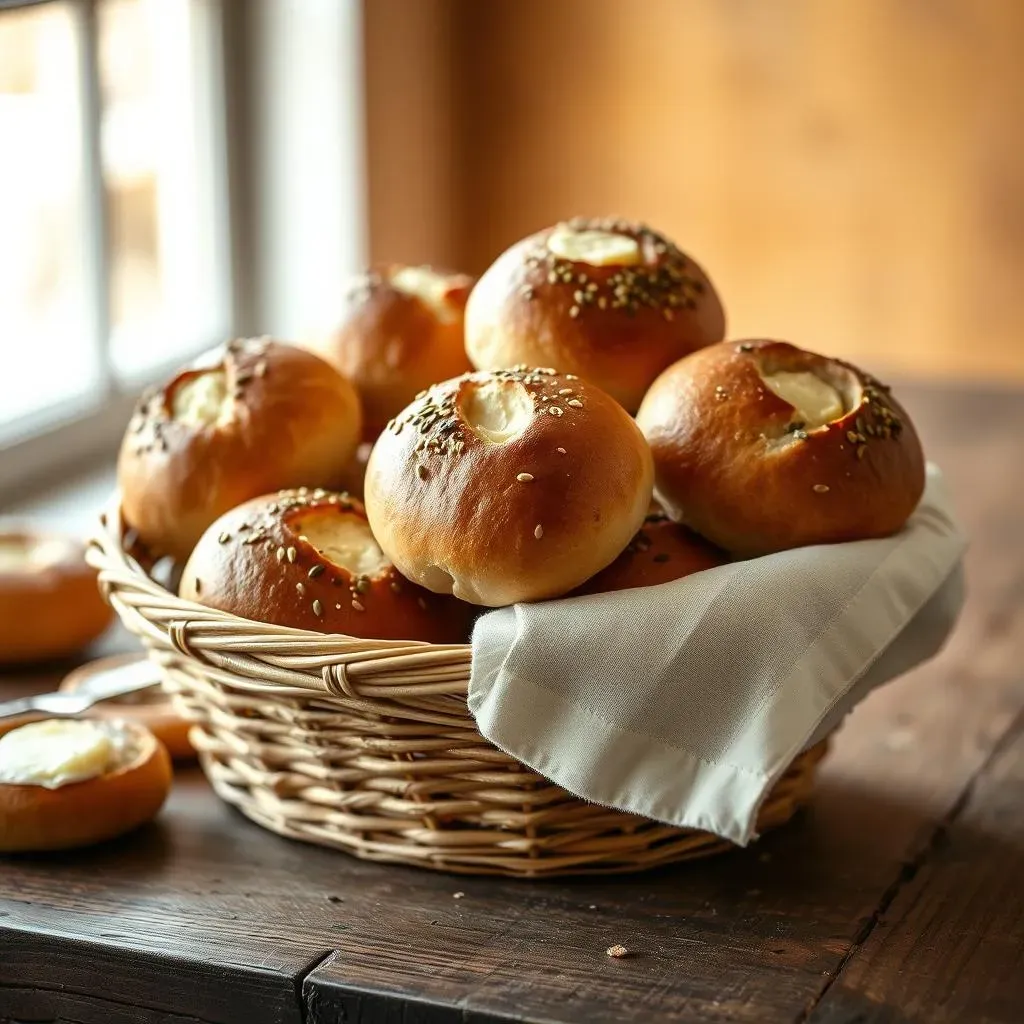
Ever dream of sinking your teeth into a perfectly crusty, yet soft and airy French bread roll, but think it's impossible because of gluten? Well, dream no more! This article is your guide to creating amazing gluten free french bread rolls right in your own kitchen. We're not talking about those dense, crumbly gluten-free imitations; we're talking about the real deal – rolls with a satisfyingly crisp exterior and a fluffy, tender inside. Forget store-bought disappointments. We'll walk you through the simple ingredients and easy-to-follow steps to achieve bakery-worthy results. Get ready to experience the joy of homemade bread again, without the gluten. From mixing the dough to achieving that perfect golden-brown crust, we'll cover everything you need to know. We'll also tackle some common issues and provide expert tips to help you bake like a pro. Whether you're a seasoned baker or a complete newbie, this guide will empower you to create the best gluten free french bread rolls you've ever tasted. So, let's get baking!
Baking the Perfect GlutenFree French Bread Rolls
Baking the Perfect GlutenFree French Bread Rolls
The Quest for the Perfect Crust
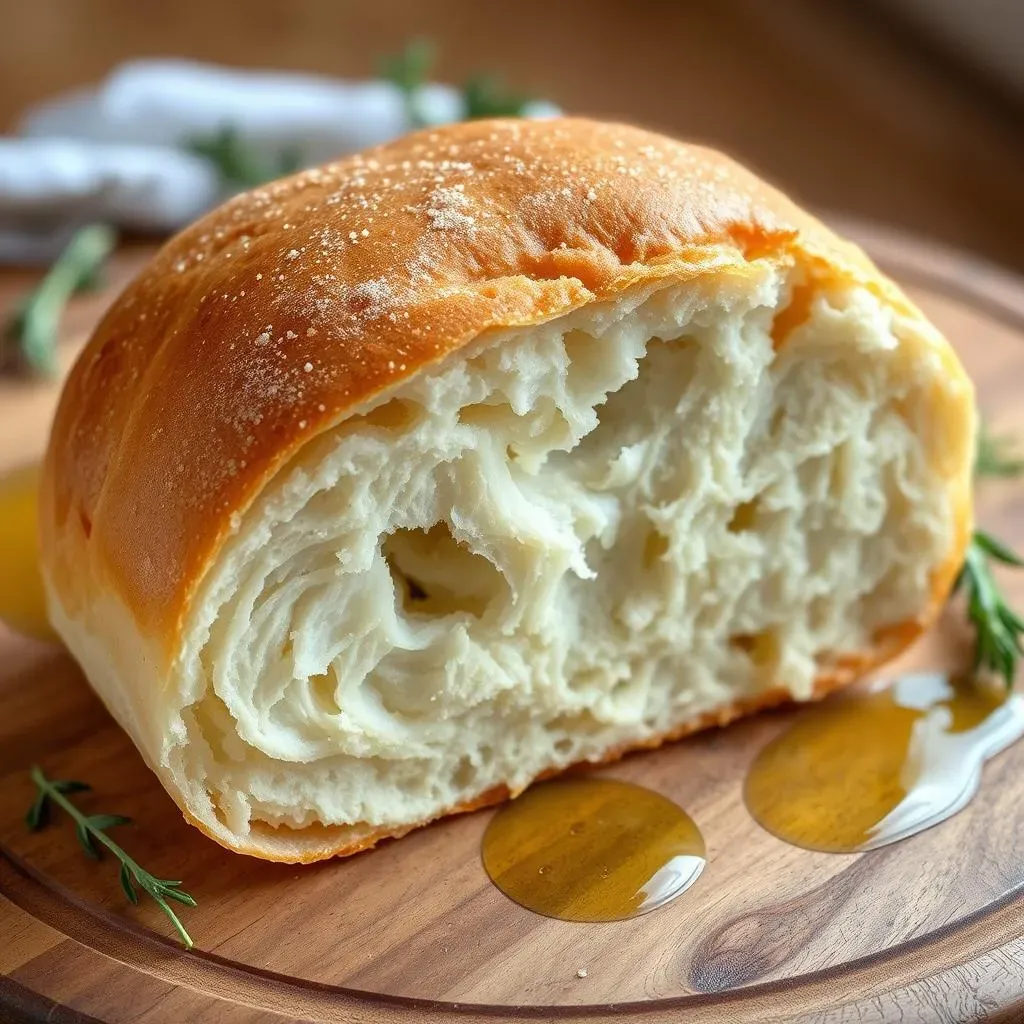
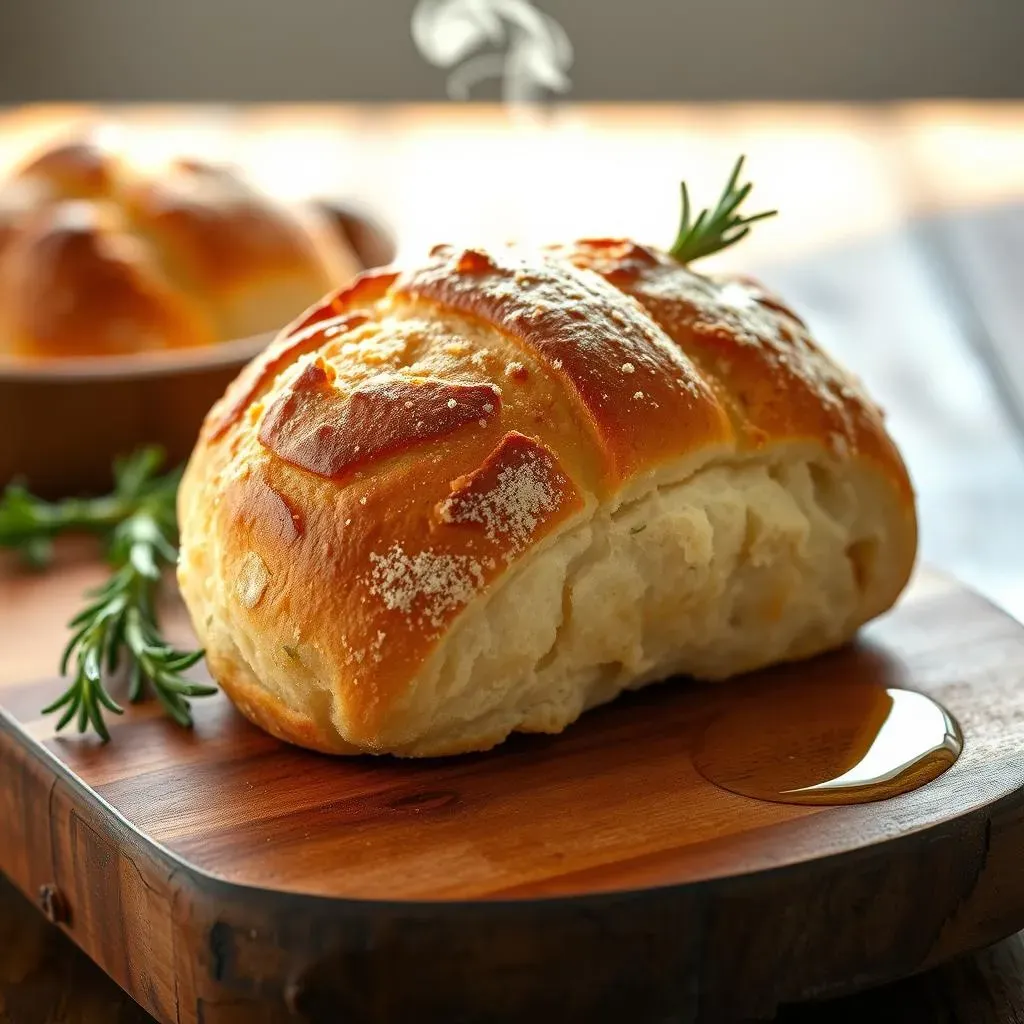
Okay, let's be real, the biggest challenge with gluten-free bread is getting that amazing crust. You know, the kind that crackles when you bite into it? It's totally possible with these gluten-free french bread rolls. The secret? Steam! Yeah, steam is your best friend here. Think of it like this: when the rolls first go into the oven, a steamy environment helps the outside stay nice and soft while the inside gets all puffy and airy. Then, when you take away the steam, the crust turns all golden and crunchy. It's like magic, but it's actually just science. I was skeptical too the first time I tried it, but now I'm a total steam convert.
I remember one time, I forgot to add the steam. My rolls came out looking pale and sad. It was a total letdown. But then I tried it with the steam, and bam! Perfect crust every time. So, don't skip that step, trust me.
The Importance of the Right Flour Blend
Now, let's talk about flour. Gluten-free baking isn't like regular baking, you can't just use any random gluten-free flour. You need a blend that’s specifically made for bread. It’s like having the right tools for a job, you wouldn't try to fix a car with a hammer, would you? Look for a blend that includes things like rice flour, tapioca starch, and maybe some sorghum flour. These all play a different role in the dough. Xanthan gum is also a must, it acts as a binder, mimicking the role of gluten. Without it, your rolls might end up a crumbly mess. And don't even think about skipping the psyllium husk, this ingredient is a game changer for texture. It helps give the rolls that chewy, satisfying bite we all crave. I used to think psyllium husk was some weird, unnecessary ingredient, but now I understand it's importance!
Ingredient | Why It Matters |
|---|---|
Gluten-Free Bread Flour Blend | Provides structure and flavor. |
Xanthan Gum | Acts as a binder, replacing gluten. |
Psyllium Husk | Improves texture and chewiness. |
Shaping and Proofing
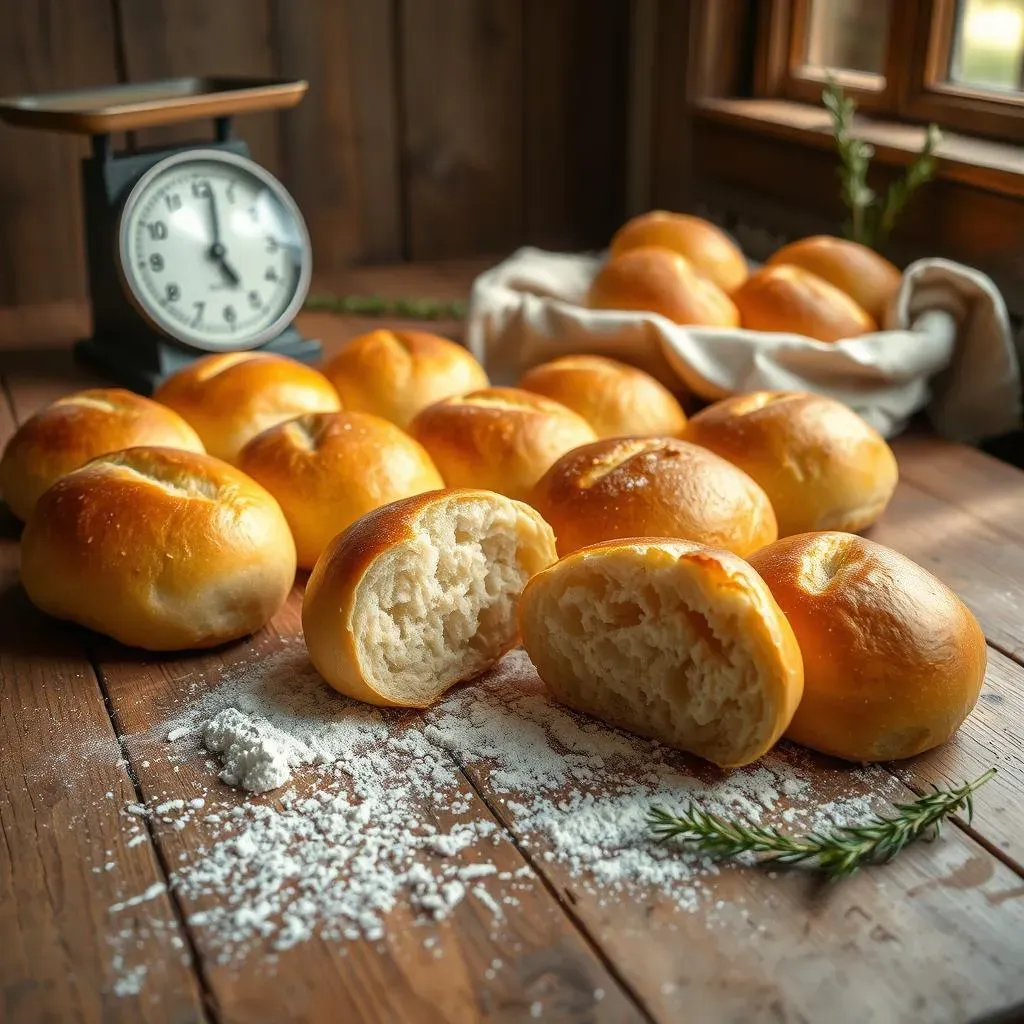
Once you have your dough, shaping the rolls is key. Don't overwork the dough, be gentle. Think of it like handling a little baby bird, you want to be careful and not squish it. I like to divide the dough into equal portions, about 2 to 4 ounces each, depending on if I want dinner rolls or something bigger. Then, I roll them into little logs or rounds. After that, it's time to let them proof, or rise. This is crucial! It allows the yeast to do its thing and create those air pockets that give you a light, airy roll. Find a warm spot, cover them up, and let them rest for about an hour. Patience is a virtue, especially in bread baking.
I have a funny story about proofing; one time, I put the dough in the oven to proof, forgetting I had it turned on to preheat. The dough rose alright, but it was a bit of a crispy disaster. Learn from my mistakes, okay?
Ingredients and StepbyStep Instructions for Gluten Free French Bread Rolls
Ingredients and StepbyStep Instructions for Gluten Free French Bread Rolls
Gathering Your Arsenal: The Ingredients
Alright, let's get down to the nitty-gritty – the ingredients. You'll need a good gluten-free bread flour blend. I can’t stress enough, not all blends are created equal. Seriously, I’ve tried some that tasted like cardboard. So, look for one with a mix of rice flour, tapioca starch, and maybe some sorghum flour. You'll also need xanthan gum, that's our gluten replacement. Don't forget the whole psyllium husks, they're key for that chewy texture, not the powder, that one can give your bread a weird color. Instant yeast, because, well, we need the bread to rise. Kosher salt, for flavor, water, olive oil, and a touch of honey, just for a hint of sweetness and to help with browning. That’s your lineup, nothing too crazy, right?
I remember once, I accidentally used baking powder instead of yeast. The result? Flat, dense discs that looked like sad pancakes. It was a baking tragedy. So, double-check your ingredients, folks!
Step-by-Step: Baking Your Gluten-Free Masterpiece
Okay, now for the fun part, let's make some magic! First, mix all your dry ingredients – the flour blend, xanthan gum, psyllium husks, yeast, and salt – in a big bowl. Then, add the wet stuff – water, olive oil, and honey. Mix it all together until it forms a sticky dough. Don't worry, it's supposed to be sticky. Next, cover the bowl and let it rest for about 10 minutes, this helps the psyllium husk do its thing. After the rest, lightly oil your hands and gently form the dough into a ball. Divide it into equal portions, about 2 to 4 ounces each, depending on how big you want your rolls. Shape them into logs or rounds, place them on a baking sheet lined with parchment paper, cover them, and let them proof in a warm place for about an hour. Once they are proofed, preheat your oven to 400°F (200°C). Right before you pop them in, spray the rolls generously with water or create steam in your oven. Bake them for about 20-25 minutes, or until they are golden brown and sound hollow when you tap the bottom. Let them cool on a wire rack before devouring. And there you have it, your very own gluten-free french bread rolls!
- Mix Dry Ingredients: Flour blend, xanthan gum, psyllium husks, yeast, salt.
- Add Wet Ingredients: Water, olive oil, honey.
- Rest: Let dough rest for 10 minutes.
- Shape: Form into a ball, divide into portions, shape into rolls.
- Proof: Let rise in a warm place for 1 hour.
- Bake: 400°F (200°C) for 20-25 minutes with steam.
- Cool: On a wire rack.
Troubleshooting, Tips, and Serving Ideas for your Gluten Free French Bread Rolls
Troubleshooting, Tips, and Serving Ideas for your Gluten Free French Bread Rolls
Common Hiccups and How to Fix Them
Okay, so sometimes things don't go exactly as planned, and that's totally fine! If your rolls are coming out dense, it's probably because your dough wasn't proofed long enough, or the yeast wasn't fresh. Make sure your yeast is active by checking if it foams when you mix it with warm water and a pinch of sugar. Also, a warm, draft-free spot is key for proper proofing, think of it as a spa day for your dough. If your rolls are too crumbly, you might need to add a bit more xanthan gum next time. And if they're coming out pale, remember that steam is vital for that golden crust! Don't be afraid to experiment with your oven to find the sweet spot. Baking is a journey, not a destination, so embrace those little mishaps, they're just learning opportunities.
I once had a batch that was so dense it could have been used as a paperweight. I learned the hard way that patience is, indeed, a key ingredient.
Problem | Possible Solution |
|---|---|
Dense Rolls | Longer proofing time, fresh yeast |
Crumbly Rolls | Add more xanthan gum |
Pale Crust | Ensure adequate steam in the oven |
Pro Tips for Gluten-Free Baking Success
Let me share some of my hard-earned wisdom. First, always weigh your flour, it's way more accurate than measuring by volume. A kitchen scale is your best friend in gluten-free baking. Second, don't skip the resting period for the dough, it allows the psyllium husk to do its job, and it makes the dough easier to handle. Third, a preheated baking sheet can help give your rolls a better rise. And finally, don't be afraid to experiment with different gluten-free flour blends to find your favorite. It's all about finding what works best for you. Remember, baking is a science, but it's also an art, so have fun with it!
I have a friend who swears by using a pizza stone to bake her rolls, she says it gives them extra crispness. I'm still trying to master that technique.
- Weigh Flour: More accurate than measuring cups.
- Rest Dough: Allows psyllium husk to activate.
- Preheat Baking Sheet: For better rise.
- Experiment with Flour Blends: Find your favorite.
Serving Suggestions and Creative Twists
Now that you've baked these awesome gluten-free french bread rolls, let's talk about how to enjoy them! They're amazing fresh out of the oven with a little butter, or try them with your favorite jam. They're also perfect for making sandwiches, sliders, or even garlic bread. I love to slice them in half and toast them for breakfast. And if you're feeling adventurous, try adding some herbs or cheese to the dough before baking. The possibilities are endless! Don’t be shy, get creative and make these rolls your own!
I once made mini-burgers using these rolls, they were a total crowd-pleaser. My friends were shocked that they were gluten-free.