Table of Contents
Are you ready to experience the joy of perfectly crisp, airy gluten-free French bread without sacrificing that authentic taste? This gluten-free french bread baguette recipe is your ticket to bakery-quality results in your own kitchen. Forget the gummy, dense disappointments of the past – this recipe, developed with precision and passion, guides you step-by-step to a baguette that rivals its gluten-filled counterpart. We’ll unravel the secrets to a truly spectacular gluten-free dough, teaching you how to achieve that signature chewy interior and satisfyingly crunchy crust. This isn’t just a recipe; it’s a journey into the art of gluten-free baking. We'll cover everything from creating the perfect dough consistency to mastering the shaping techniques that give baguettes their iconic form. Then, we'll explore optimal baking methods to ensure a golden-brown crust and a light, airy crumb. Finally, we'll share some mouthwatering ideas on how to enjoy your freshly baked masterpiece. So, gather your ingredients, and let's embark on this delicious adventure together! Get ready to impress yourself (and everyone else) with this incredible gluten-free french bread baguette recipe.
Mastering the GlutenFree French Bread Baguette Dough
Mastering the GlutenFree French Bread Baguette Dough
Understanding Gluten-Free Flour Blends
So, you're diving into the world of gluten-free baking, huh? Brave soul! Making a great gluten-free baguette is all about understanding your flour blend. Forget single flours – they just won't cut it for that authentic baguette texture. You need a blend that combines the strengths of different gluten-free flours. Think of it like a superhero team – each flour brings a unique power. Tapioca flour adds chewiness, rice flour provides lightness, and xanthan gum acts as the binding agent, mimicking the role of gluten. Experiment! Different blends yield different results. Don't be afraid to tweak ratios until you find your perfect combination.
The key is to find a balance. Too much of one flour and your baguette might be gummy or crumbly. It's a bit of a science, but also an art. Trust your instincts, and don't be discouraged by a few less-than-perfect attempts. Think of it as your gluten-free baguette training montage – each failed attempt makes the next one better.
Flour Type | Properties | Typical Role in Blend |
|---|---|---|
Tapioca Flour | Adds chewiness and moisture | Provides structure and chew |
Rice Flour | Adds lightness and a neutral flavor | Balances texture, prevents gumminess |
Xanthan Gum | Acts as a binder, mimicking gluten | Essential for structure and elasticity |
Hydration is Key
Now, let's talk hydration. This isn't just about adding water; it's about understanding how much water your specific flour blend needs to create the perfect dough consistency. Too little water, and your dough will be dry and crumbly. Too much, and it'll be sticky and difficult to work with. Think of Goldilocks and the Three Bears, but instead of porridge, it's dough. You want that "just right" level of hydration.
Start with the recipe's suggested amount of liquid. But be prepared to adjust based on your flour blend and the humidity levels. The goal is a dough that's slightly sticky but still manageable. It should pull away from the sides of the bowl but not be completely dry. A good trick is to use your hands – feel the dough. Does it feel right? Does it have the right amount of elasticity? If not, adjust accordingly. Remember, practice makes perfect.
- Start with the recipe's suggested liquid amount.
- Gradually add more liquid, a tablespoon at a time, until you achieve the desired consistency.
- Don't be afraid to adjust based on your flour blend and humidity.
Essential Tips for Shaping Perfect GlutenFree Baguettes

Essential Tips for Shaping Perfect GlutenFree Baguettes
The Gentle Art of Gluten-Free Shaping
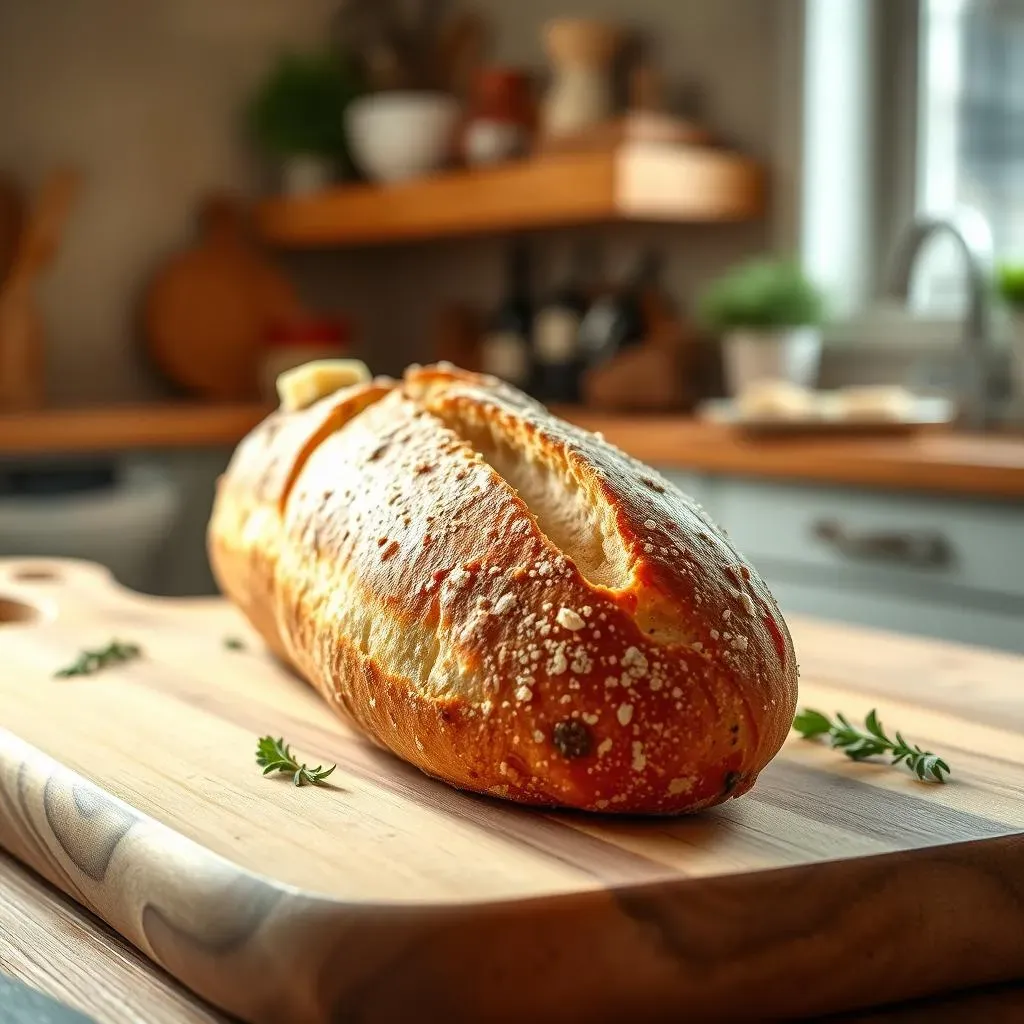
Okay, so you've got your amazing gluten-free dough. Now comes the fun part: shaping those baguettes! Unlike their gluten-filled cousins, gluten-free dough is a bit more delicate. You need a gentle touch – think of it like handling a newborn kitten, not a wrestling bear. Forget aggressive kneading or tossing. We're going for finesse here. Start by gently stretching and folding the dough. This develops some structure without tearing it. Then, gently roll it into a rough rectangle. Now comes the crucial part: creating the baguette shape. Don't worry if it's not perfect; it's all about the process. This is where your artistic side gets to shine. Remember, these aren't mass-produced loaves; they're handmade with love.
Once you have your rough baguette shape, gently transfer it to a baking sheet lined with parchment paper. This prevents sticking and makes for easy cleanup. Now, the final touch. Use a sharp knife or lame (a special bread-scoring tool) to make several diagonal slashes along the top of the baguette. This not only looks beautiful but also helps the bread rise evenly and prevents it from cracking unevenly in the oven. It's a small detail, but it makes a big difference! Think of it as your baguette's signature flourish.
- Gently stretch and fold the dough.
- Roll into a rectangle, then shape into a baguette.
- Transfer to a parchment-lined baking sheet.
- Score the top with diagonal slashes.
Dealing with Delicate Dough
Let's be real, gluten-free dough can be a bit temperamental. It's not as forgiving as its gluten-containing counterparts. That's why it's crucial to be gentle. Avoid aggressive handling, which can lead to tears and a less-than-perfect shape. Remember, we're aiming for a graceful, elegant baguette, not a mangled mess. If your dough feels too sticky, lightly dust your work surface with gluten-free flour. However, be mindful not to add too much, as this can dry the dough out. The goal is to find that perfect balance between stickiness and manageability.
One helpful tip is to let the dough rest for a short period after shaping. This allows the gluten-free flour blend to relax and helps prevent shrinkage during baking. Think of it as a little pre-baking meditation session for your baguette. During this rest, the dough can regain some strength and become more stable, leading to a more structurally sound final product. This short rest period is surprisingly effective in improving the overall shape and texture of your gluten-free baguette.
Problem | Solution |
|---|---|
Dough too sticky | Lightly dust with gluten-free flour |
Dough too dry | Add a tiny bit of water, a teaspoon at a time |
Dough tearing | Handle more gently, let it rest |
Baking Your GlutenFree French Bread Baguette to Perfection
Baking Your GlutenFree French Bread Baguette to Perfection
The Importance of Oven Temperature and Steam
Alright, your beautifully shaped baguettes are ready for their star turn in the oven. But before you pop them in, let's talk about the crucial role of temperature and steam. For a truly authentic baguette, you need a hot oven – think scorching hot, like a dragon's breath. This high temperature helps create that signature crispy crust. A lower temperature will result in a softer, less impressive crust. Aim for around 450°F (232°C). But that's not the whole story. Steam is your secret weapon. It creates a magical environment that allows the baguette to expand beautifully and develop that amazing crust.
You can generate steam in a few ways. The easiest method is to place a pan of hot water on the bottom rack of your oven before preheating. The steam created as the water heats up will create that perfect environment for your baguettes. Another option is to spray the oven walls and baguettes with water during the initial baking minutes. This can be a bit trickier, but it's effective. Experiment to find what works best in your oven. Remember, the goal is that beautiful, crackly crust and a light, airy interior. Think of the steam as a magician's puff of smoke – transforming your baguettes into culinary masterpieces.
Method | Description | Pros | Cons |
|---|---|---|---|
Pan of Water | Place a pan of hot water on the bottom rack before preheating. | Simple, effective | Can be messy |
Spray Bottle | Spray the oven walls and baguettes with water during the first few minutes of baking. | More precise control | Requires more skill |
Baking Time and Doneness
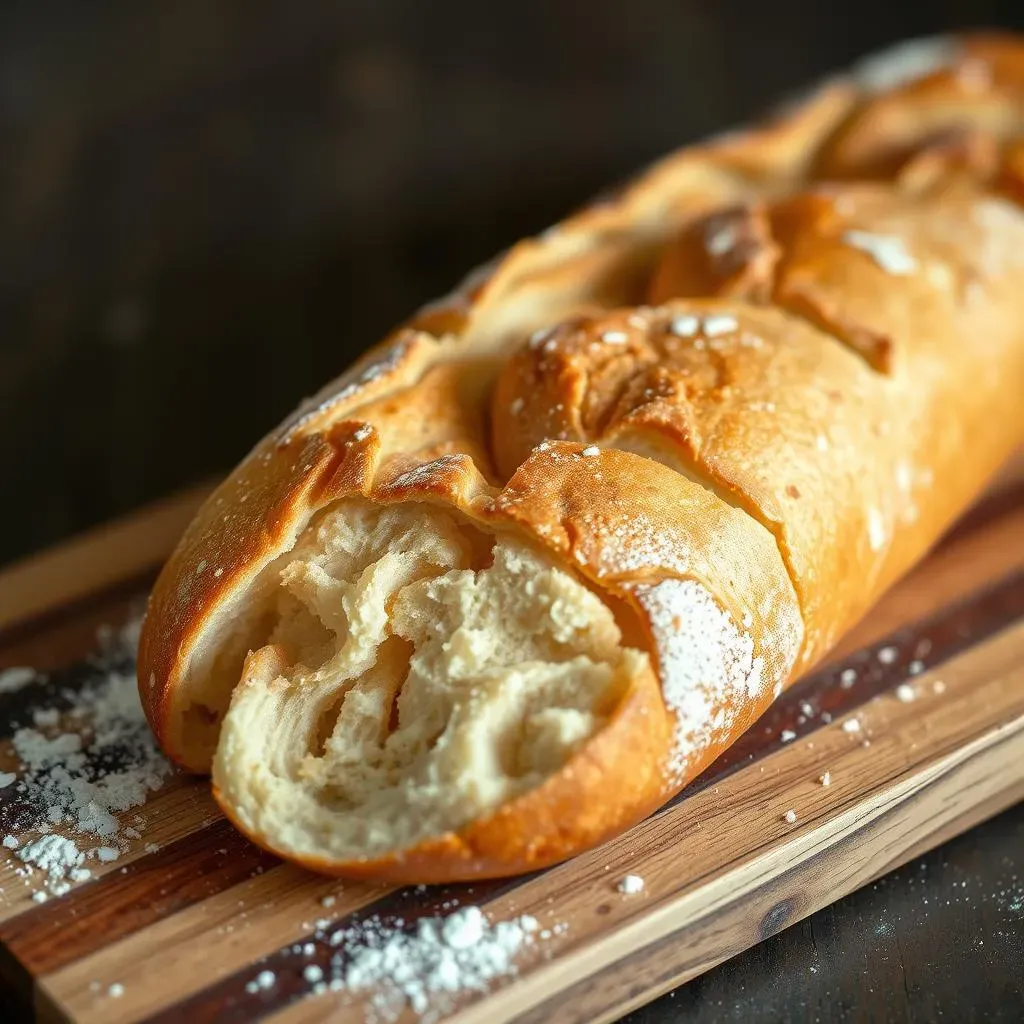
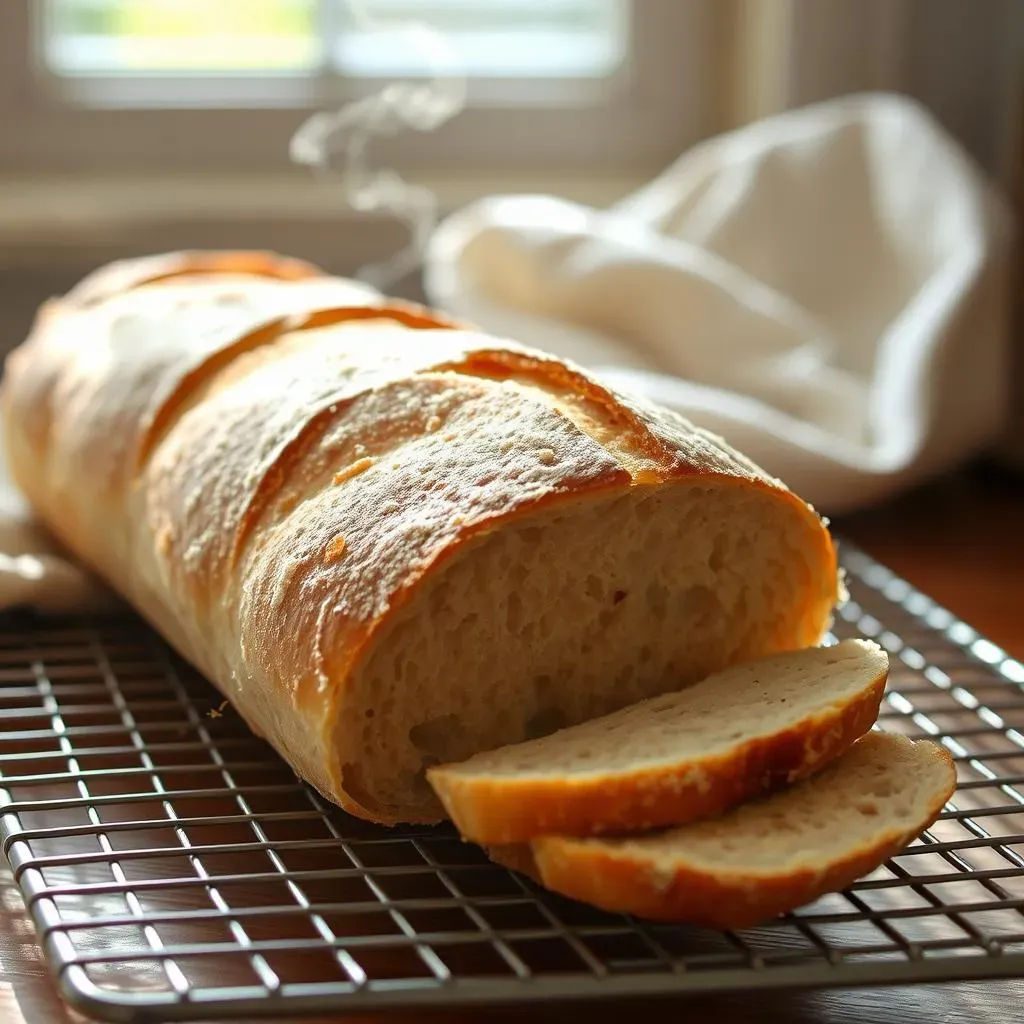
Now, let's talk about baking time. This varies depending on your oven, the size of your baguettes, and your flour blend. However, a good rule of thumb is to bake for about 20-25 minutes, or until the baguettes are deeply golden brown and sound hollow when tapped on the bottom. Don't open the oven door too frequently during baking; this will cause a sudden drop in temperature and affect the rise. Resist the urge to peek! Patience, young padawan. Trust the process. It's like waiting for a perfectly brewed cup of tea – the anticipation is half the fun.
Once your baguettes are baked, remove them from the oven and let them cool completely on a wire rack before slicing and serving. This allows the crust to crisp up further and prevents the interior from becoming soggy. This cooling process is just as important as the baking itself. It's the final step in transforming your dough into a perfect baguette. Think of it as the final flourish, the finishing touch on a masterpiece. Enjoy the aroma, the texture, and the taste of your freshly baked gluten-free French bread baguettes. You deserve a pat on the back, my friend. You did it!
- Bake at 450°F (232°C) for 20-25 minutes.
- Check for doneness by tapping the bottom – it should sound hollow.
- Cool completely on a wire rack before slicing.
Delicious Ways to Enjoy Your GlutenFree French Bread Baguette Recipe
Delicious Ways to Enjoy Your GlutenFree French Bread Baguette Recipe
The Classic French Dip
Let's start with a timeless classic: the French Dip sandwich. The warm, slightly chewy texture of your gluten-free baguette is the perfect vessel for juicy roast beef, melted cheese, and a rich, flavorful au jus. The slight crispiness of the crust provides a delightful contrast to the tender meat and gooey cheese. It's a symphony of textures and flavors that will leave you wanting more. Imagine the warm, savory juices soaking into the bread, creating a mouthwatering experience with every bite. This is not just a sandwich; it's an experience.
To elevate your French Dip even further, consider adding caramelized onions or horseradish for an extra layer of complexity. Experiment with different cheeses – provolone, Gruyère, or even a sharp cheddar – to find your perfect combination. Don't be afraid to get creative! The possibilities are endless. Remember, the best French Dip is the one you enjoy the most. So, experiment, have fun, and savor every bite.
Ingredient | Role | Suggestion |
|---|---|---|
Roast Beef | Main protein | Thinly sliced, medium-rare |
Cheese | Adds richness and melt | Provolone, Gruyère, Cheddar |
Au Jus | Adds flavor and moisture | Beef broth based, with herbs and spices |
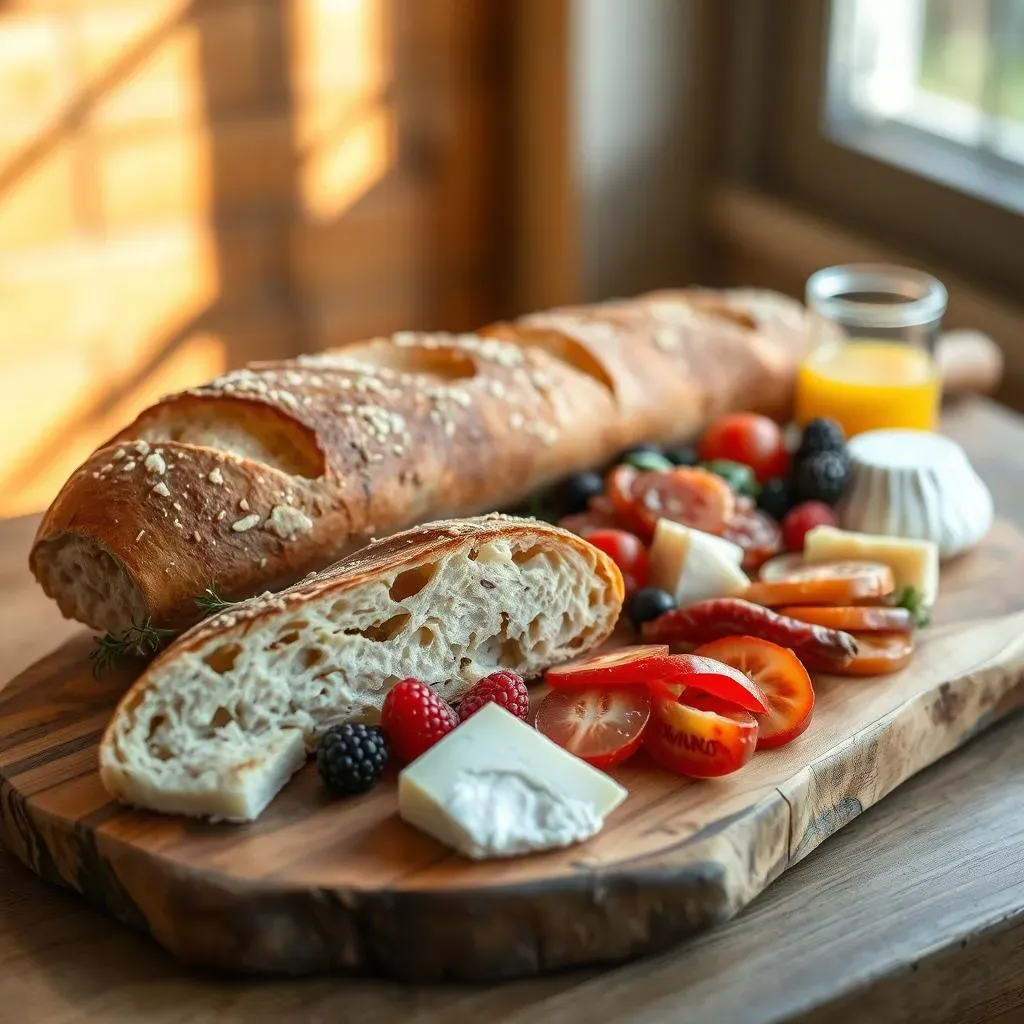
Beyond the Sandwich: Bruschetta, Crostini, and More
But the culinary adventures don't stop at sandwiches! Your freshly baked gluten-free baguette is incredibly versatile. Slice it into thick rounds for bruschetta, topping them with vibrant combinations of tomatoes, basil, garlic, and balsamic glaze. The slight chewiness of the bread provides a perfect base for the fresh, bright flavors of the topping. It's a taste of summer, even in the dead of winter. The possibilities are as limitless as your imagination.
Or, create elegant crostini by brushing the slices with olive oil and toasting them until golden brown. Then, top them with various savory or sweet combinations. Think creamy goat cheese and fig jam, or a simple spread of pesto and sun-dried tomatoes. The versatility of your gluten-free baguette allows for culinary creativity that is simply unmatched. It's a blank canvas for your culinary masterpieces. So go ahead, unleash your inner artist and create something truly special.
- Bruschetta: Topped with fresh tomatoes, basil, garlic, and balsamic glaze.
- Crostini: Brushed with olive oil and toasted, then topped with various savory or sweet combinations.
- Garlic Bread: Brushed with garlic butter and herbs, then toasted to perfection.
- French Toast: Dipped in a custard mixture and pan-fried until golden brown.