Table of Contents
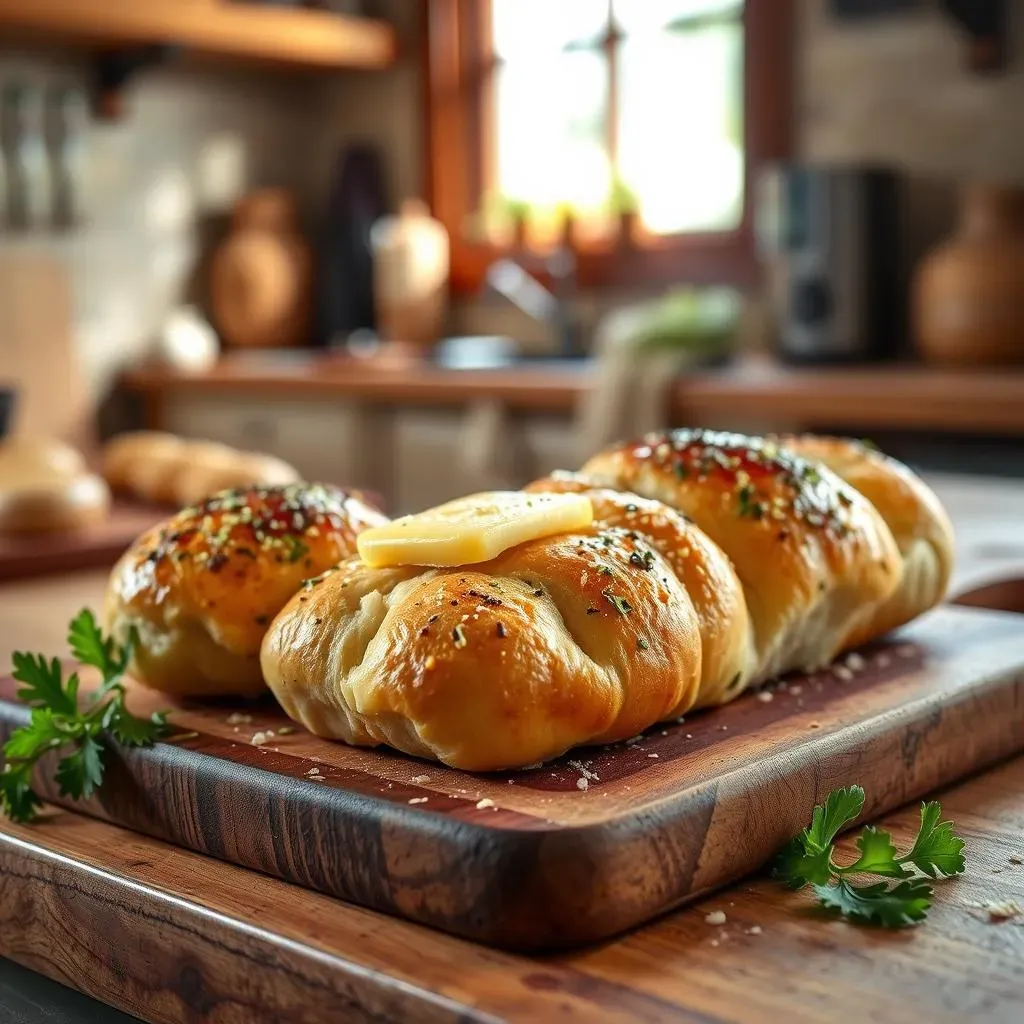
Ever dream of that perfect, crispy-on-the-outside, soft-on-the-inside garlic bread? You know, the kind that makes your kitchen smell like a little slice of heaven? Well, get ready, because we're about to make that dream a reality. Forget those sad, store-bought versions; we're talking about homemade, utterly irresistible french roll garlic bread. This isn't just any recipe; it's a journey into the heart of flavor, where simple ingredients combine to create something truly magical. I'll walk you through every step, from picking the perfect french roll to achieving that golden-brown, garlicky perfection. Get ready to learn the secrets to making french roll garlic bread that will have everyone begging for more. We'll cover the basics, dive into some fun customizations, and even discuss the best ways to serve and store your garlicky creation. So, let's get started and transform your kitchen into a garlic bread paradise!
The Secret to Perfect French Roll Garlic Bread
The Secret to Perfect French Roll Garlic Bread
Okay, so you want to know the real secret to amazing french roll garlic bread? It's not some crazy chef technique, I promise. It all boils down to a few key things: quality ingredients, the right technique, and a little bit of love. First, you need a great french roll; not the super soft kind, but one with a bit of crust to it. Think of it like the foundation of a house, you need something sturdy. Then, we need real butter, not that margarine stuff, softened to the point where it's easy to spread. Garlic, of course, is the star, and fresh garlic, minced finely, is going to give you that punchy flavor we're after. Finally, fresh parsley adds a touch of brightness, and a sprinkle of sea salt elevates everything. So, it's all about the quality and freshness of the ingredients, it's not difficult at all, right?
Here's a quick ingredient checklist:
- A good quality french roll
- Real butter (softened)
- Fresh garlic (minced)
- Fresh parsley (chopped)
- Sea salt
Easy Steps for Making French Roll Garlic Bread at Home

Easy Steps for Making French Roll Garlic Bread at Home
Prepping Your Bread
Alright, let's get our hands a little buttery! First, grab that french roll and slice it lengthwise. This is super important, you want to expose as much of the inside as possible. Imagine you're opening up a book; that's what we're doing with the bread. Don't cut all the way through, you want it to stay in one piece, like a hinged book. Now, set that aside while we make the garlic butter. It’s the real star of the show. It is very easy to do, and you will be amazed at the final product.
Making the Garlic Butter
Next, take that softened butter and put it in a small bowl. Add in your minced garlic, chopped parsley, and a good pinch of sea salt. Now, mix it all together until everything is well combined. You want that garlic and parsley evenly distributed throughout the butter. It should look like a beautiful, fragrant, green and white mixture. Think of it as a culinary masterpiece in a bowl, even before it hits the oven. This is where we create the flavor magic, right here, in this little bowl.
Step | Action |
|---|---|
1 | Slice french roll lengthwise |
2 | Mix softened butter, garlic, parsley, and salt |
Baking to Perfection
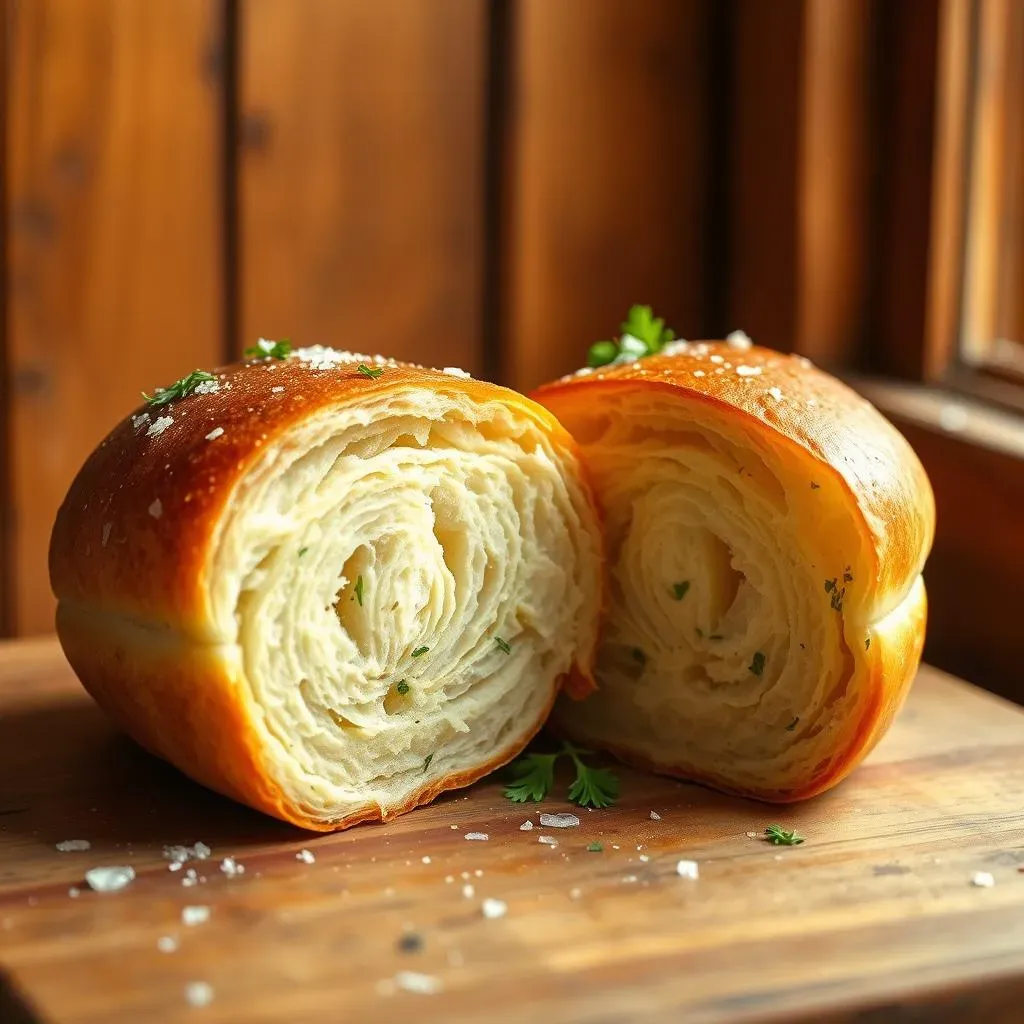
Now, it's time to spread that glorious garlic butter all over the cut sides of your french roll. Be generous, don't be shy! Make sure every nook and cranny is covered. Pop the bread onto a baking sheet and slide it into a preheated oven at 375°F (190°C). Bake for about 10-15 minutes, or until the bread is golden brown and crispy, and that garlic butter is bubbling. Keep an eye on it, ovens can be a little temperamental. When it's ready, take it out of the oven, and prepare to be amazed by the smell. You've just created a masterpiece!
Customizing Your French Roll Garlic Bread: Tips and Tricks
Customizing Your French Roll Garlic Bread: Tips and Tricks
Cheese, Please!
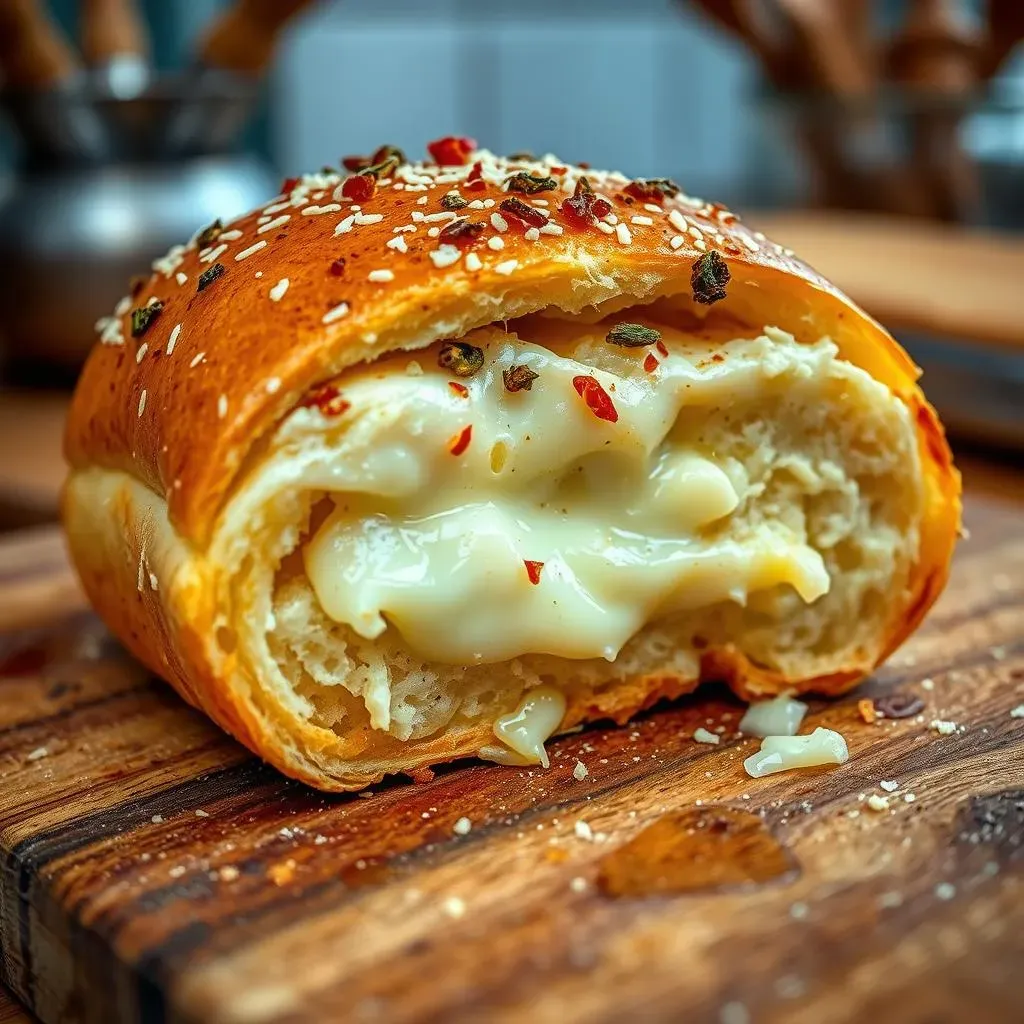
Okay, so you’ve got the basic garlic bread down, but what if you want to take it up a notch? Let’s talk cheese, because who doesn’t love a little extra cheesy goodness? Adding a layer of grated cheese before baking can transform your garlic bread from amazing to absolutely divine. Think about a sprinkle of Parmesan for a salty, nutty flavor, or maybe some mozzarella for that gooey, stretchy goodness. If you're feeling fancy, a blend of both is just heavenly. You can even add a little bit of provolone for some extra tang. The key is to add the cheese after you've spread the garlic butter, so it melts perfectly into all those buttery crevices. Don't be shy, be generous with the cheese, you will not regret it.
Spice It Up!
Want to add a little kick to your garlic bread? Let's spice things up! A pinch of red pepper flakes in your garlic butter will give it a nice, subtle heat. It's not overpowering, but it adds a little something extra that makes people wonder what your secret ingredient is. You can also consider adding some dried herbs, like oregano or basil, for a more complex flavor profile. Or, for a smoky twist, try a dash of smoked paprika. These small additions can completely change the character of your garlic bread, making it unique and totally your own. Experiment with different spices and herbs to find your favorite flavor combination, it's a fun way to make it your own.
Spice | Flavor Profile |
|---|---|
Red Pepper Flakes | Subtle Heat |
Dried Oregano | Earthy, Savory |
Smoked Paprika | Smoky, Rich |
Serving and Storing Your Delicious French Roll Garlic Bread
Serving and Storing Your Delicious French Roll Garlic Bread
Serving Suggestions
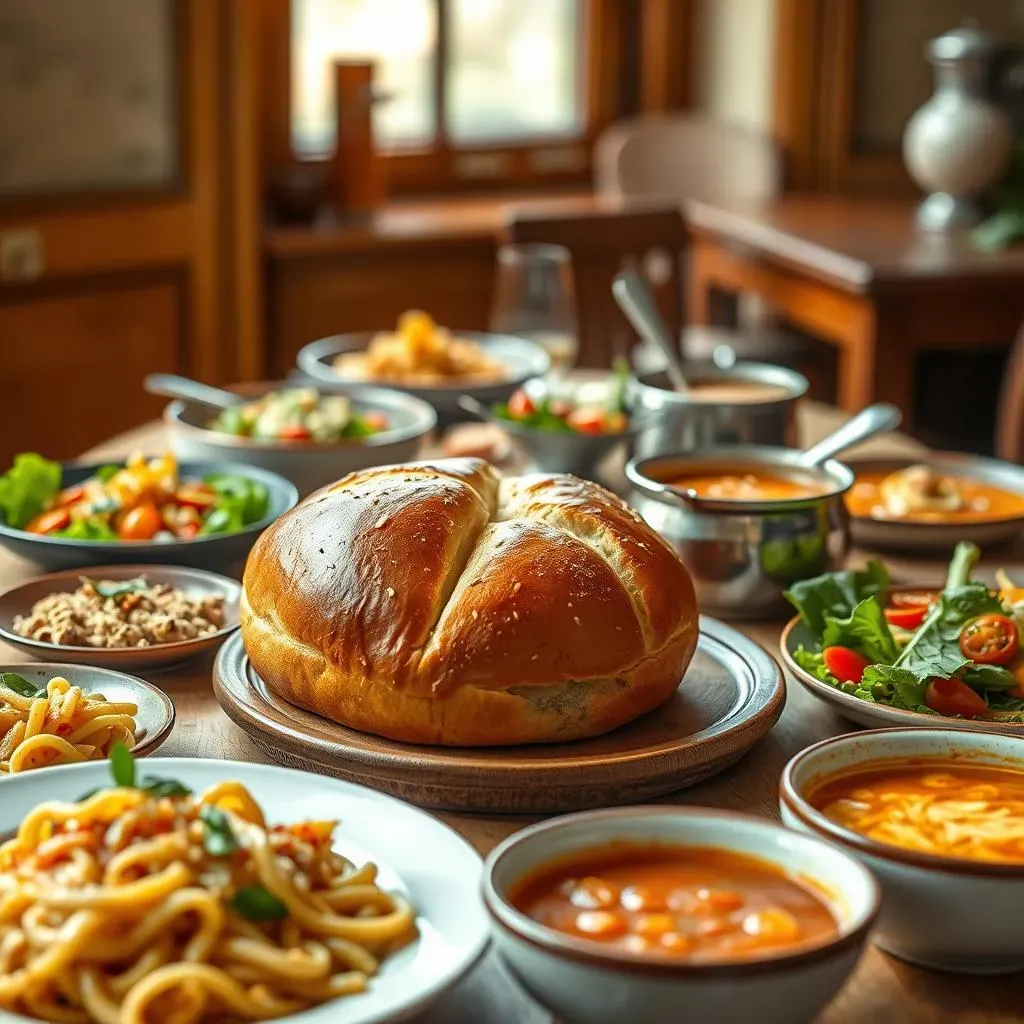
Alright, you've pulled that beautiful, golden-brown garlic bread out of the oven, and the smell is driving everyone crazy. Now, how do you serve this masterpiece? Well, the beauty of french roll garlic bread is its versatility. It's fantastic alongside a big plate of pasta, like spaghetti with marinara or creamy fettuccine alfredo. It's also a wonderful addition to any soup or stew, perfect for dunking and soaking up all those delicious flavors. And let's not forget a simple salad; the garlic bread adds a nice carb element to a lighter meal. Honestly, it’s great with almost anything. Or, if you’re feeling snacky, just eat it as is! It’s so good, you really don't need an excuse to enjoy it.
Storing Leftovers (If There Are Any!)
Okay, let's be real, sometimes there are leftovers, even with something as delicious as this. If you happen to have some garlic bread remaining, the best way to keep it fresh is to wrap it tightly in foil or plastic wrap. You can also place it in an airtight container to prevent it from drying out. Store it at room temperature for up to two days, or you can pop it in the fridge for up to a week. When you're ready to enjoy it again, a quick reheat in the oven at 350°F (175°C) for a few minutes will bring back some of that crispiness. You can also use a toaster oven for smaller portions. Just keep an eye on it, so it doesn't get too brown. No one likes burnt garlic bread!
Storage Method | Duration |
|---|---|
Room Temperature | Up to 2 days |
Refrigerator | Up to 1 week |
Freezing for Future Garlic Bread Cravings
Want to have garlic bread on hand for whenever the craving strikes? You can absolutely freeze it! Let the garlic bread cool completely, then wrap it tightly in plastic wrap, followed by a layer of foil. This double wrapping helps prevent freezer burn. Place the wrapped bread in a freezer bag and label it with the date. It can last in the freezer for up to three months. When you're ready to bake it, you can bake it straight from the freezer. Just add a few extra minutes to the baking time. It’s a great way to prep ahead for parties or just those nights when you need a quick and easy side. Having some frozen garlic bread on hand is like having a little secret weapon in your kitchen arsenal.