Table of Contents
Ever dreamed of biting into a crusty, golden-brown baguette, its airy interior yielding to a delightful chew? That perfect French bread baguette recipe, once a culinary mystery, is now within your reach! This comprehensive guide will take you on a journey from gathering the essential ingredients to achieving that perfect bake, transforming your kitchen into a mini Parisian boulangerie. We'll explore the art of selecting the right flour, understanding the nuances of hydration, and mastering the techniques of shaping and scoring your baguettes. You'll discover the secrets to achieving that signature crispy crust and the perfectly chewy interior, all while enjoying a straightforward process. We'll also delve into essential tips and tricks for baking and serving your homemade french bread baguette recipe, ensuring every loaf is a masterpiece. Get ready to impress your friends and family with authentic French bread, made with love (and this ultimate guide!). Prepare to be amazed by how simple it is to recreate this iconic culinary delight right in your own home. Let's embark on this delicious adventure together, one perfectly crafted baguette at a time!
Mastering the French Bread Baguette Recipe: A StepbyStep Guide
Mastering the French Bread Baguette Recipe: A StepbyStep Guide
Mixing the Dough
First, gather your ingredients: flour, water, yeast, and salt. A kitchen scale is your best friend here for accuracy! Precise measurements are key to a successful baguette. Don't eyeball it; weigh everything. Combine the flour, yeast, and salt in a large bowl. Gradually add the water, mixing with your hands until a shaggy dough forms. Don't worry if it's sticky; that's normal for a high-hydration dough. Let the dough rest for about 15 minutes, covered. This allows the flour to fully hydrate. This is called autolyse, and it's a crucial step for developing flavor and texture.
Next up is the stretch and fold. This gentle technique builds gluten strength without overworking the dough. Over the next hour and a half, perform three sets of stretch and folds, about 30-45 minutes apart. For each set, gently grab one side of the dough, stretch it upwards, and fold it over onto itself. Rotate the bowl and repeat for all four sides. This process strengthens the dough and creates that beautiful, airy crumb we all crave. After the final stretch and fold, cover the bowl and refrigerate the dough for 12-14 hours. This slow fermentation, called cold retarding, develops complex flavors and enhances the texture.
Step | Action | Timing |
|---|---|---|
1 | Combine dry ingredients | Immediately |
2 | Add water, mix until shaggy | Immediately |
3 | Autolyse (rest covered) | 15 minutes |
4 | Stretch and folds (3 sets) | 1.5 hours |
5 | Refrigerate | 12-14 hours |
Shaping and Proofing
Once the dough has chilled, gently turn it out onto a lightly floured surface. Divide the dough into three equal pieces. Shape each piece into a rough rectangle, and let them rest for 45-60 minutes, covered. This allows the gluten to relax. This step is crucial for easier shaping and prevents tearing.
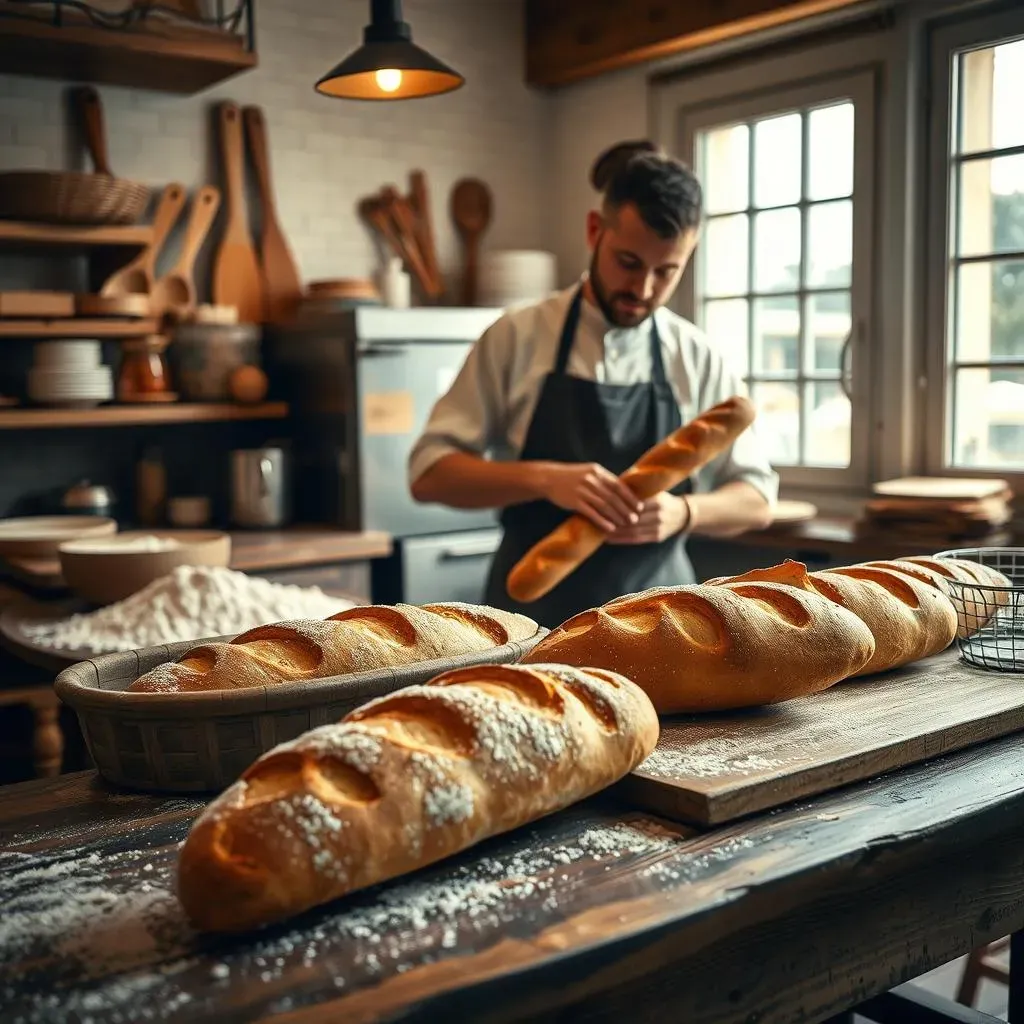
Now comes the fun part: shaping the baguettes! Gently roll each rectangle into a long, roughly 14-15 inch cylinder. Seal the seams tightly to prevent them from bursting open during baking. For a visual guide on shaping, check out this helpful French baguette shaping video. Place the shaped baguettes seam-side up on a floured couche or a piece of parchment paper. Let them proof at room temperature for 30-60 minutes, or until they’ve almost doubled in size and spring back slowly when gently poked. This final proofing step is essential for a light and airy crumb.
- Gently turn dough out onto floured surface
- Divide into three equal pieces
- Shape into rectangles, rest 45-60 minutes
- Roll into cylinders, seal seams
- Proof seam-side up on couche or parchment
Essential Ingredients for the Perfect French Bread Baguette Recipe
Essential Ingredients for the Perfect French Bread Baguette Recipe
The Flour Power
Let's talk flour – the backbone of any great baguette. You want a flour with a good protein content (around 12-14%), which provides the gluten needed for structure and that signature chewy crumb. King Arthur Flour's all-purpose flour is a popular choice among home bakers, offering a reliable balance of protein and ease of use. But don't be afraid to experiment! Many other strong flours will work, too. Just make sure to check the protein content on the label. Using a kitchen scale to measure your flour ensures consistency, so ditch the measuring cups and embrace precision!
Think of the flour as the foundation of your baguette. A good flour provides the structure and elasticity for a beautiful rise. Think of it like the scaffolding for a building – you need a solid base to support the entire structure. A lower protein flour will result in a less chewy texture. A higher protein flour will result in a chewier, denser texture. Finding the right flour for your taste is part of the fun!
- King Arthur Flour All-Purpose
- High-protein bread flour (check the label)
- French T55 flour
Water Works Wonders
Next, we have water. It might seem simple, but the quality and temperature of your water significantly impact the final product. Use filtered water if possible, avoiding tap water with strong mineral content or chlorine, which can affect the yeast's activity. Room temperature water (around 70-75°F) is ideal for most yeast strains. Too cold, and fermentation will be slow. Too hot, and you risk killing the yeast before it even gets started. Think of the water as the catalyst in this recipe, activating the yeast and bringing all the ingredients together.
The amount of water you use is crucial; it determines the hydration level of your dough. A higher hydration dough (more water relative to flour) will result in a more open crumb. A lower hydration dough will be easier to handle but may yield a denser crumb. Don't be afraid to experiment with hydration levels to find what works best for you and your flour. For a visual guide on what to look for, check out this baguette baking guide to get a better understanding of how hydration impacts the dough. Remember, precision is key, so use a kitchen scale!
Ingredient | Importance | Effect of Variation |
|---|---|---|
Water | Activates yeast, determines dough consistency | Too much: sticky dough, less structure; Too little: dry dough, dense crumb |
Techniques for Shaping and Scoring Your French Bread Baguettes
Techniques for Shaping and Scoring Your French Bread Baguettes
The Art of Shaping
Alright, friend, let's talk shaping. This isn't just about making a pretty baguette; the way you shape the dough directly impacts the final texture and rise. Remember those relaxed rectangles from the previous step? Now, we're going to gently transform them into elegant cylinders. Start by gently stretching one of the longer sides of the rectangle towards you, folding it over itself, and pinching the seam to seal it. Repeat this process two more times, creating a layered cylinder. The goal is to create a tight, smooth cylinder without squeezing out all the air. Think of it like wrapping a present – you want it neat and tidy, but not so tight that the paper tears.
Once you've got your layered cylinder, gently roll it out to your desired length (about 14-15 inches for a classic baguette). Again, be gentle! You don't want to deflate the dough. A little flour on your work surface and hands can help prevent sticking. The final shape should be uniform in thickness, with a slightly rounded top. This ensures even baking and a beautiful, consistent rise. For a more detailed visual guide, check out our step-by-step baguette shaping video – it'll walk you through every step.
- Gently stretch and fold the rectangle three times
- Roll into a 14-15 inch cylinder, sealing seams tightly
- Ensure uniform thickness and a slightly rounded top
The Crucial Score
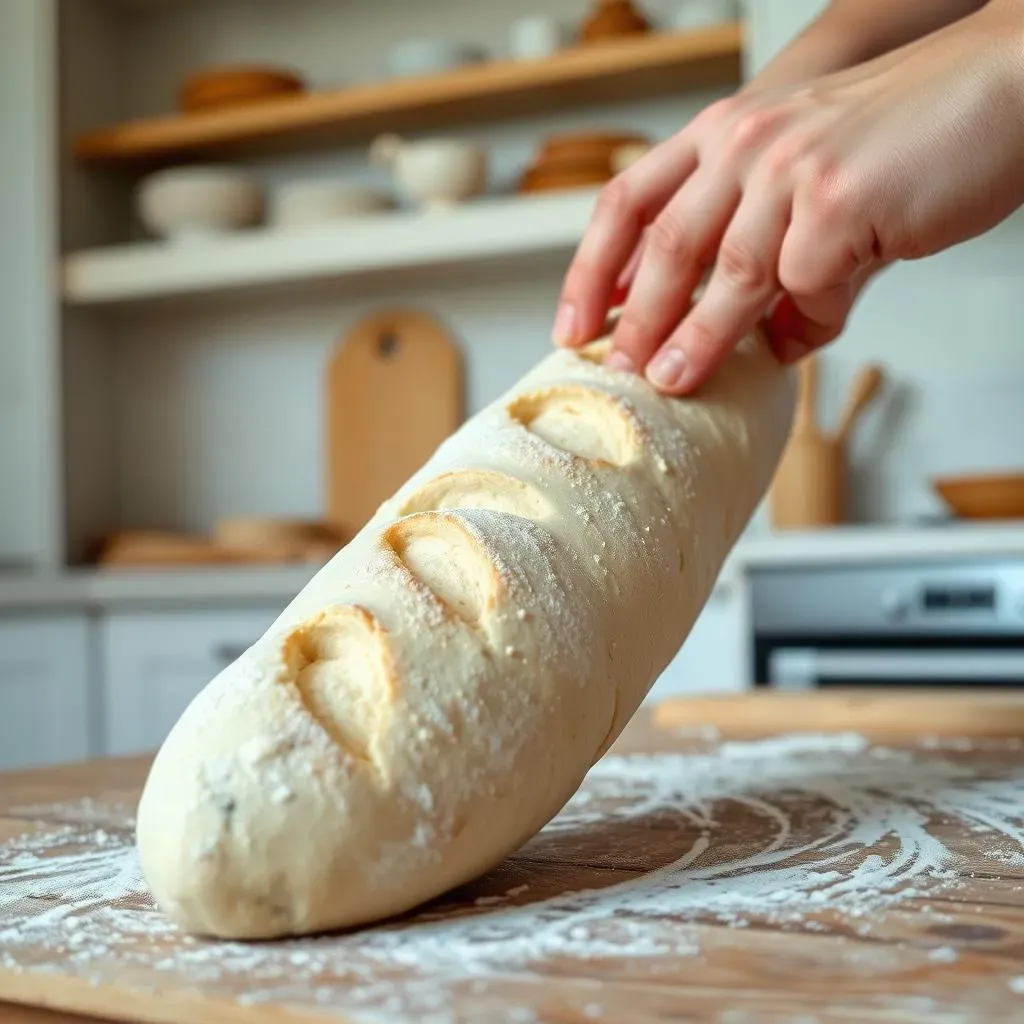
Now, let's talk scoring. This isn't just about aesthetics; scoring creates controlled vents for the expanding gases during baking, preventing the baguette from bursting unpredictably. A sharp lame (a specialized baker's tool) is ideal, but a very sharp knife or even a razor blade will work in a pinch. Make three to five diagonal cuts, about 1/3 to 1/2 inch deep, keeping your cuts firm and consistent. Don't be afraid to make deep cuts, but avoid cutting all the way to the edges. The scoring should be just firm enough to allow the dough to expand without tearing.
The angle and depth of your scores influence the "ears" – those beautiful, flared tips that characterize a perfect baguette. A shallower score will yield smaller ears. A deeper score will produce larger, more dramatic ears. Practice makes perfect, so don't be discouraged if your first few attempts aren't picture-perfect. Experiment with different angles and depths until you find your preferred style. Remember to check out our guide to baguette scoring for more tips and tricks. A well-executed score is the final flourish, adding both elegance and functionality to your baguette.
Scoring Depth | Resulting Ear Size |
|---|---|
Shallow (1/4 inch) | Small ears |
Medium (1/2 inch) | Medium ears |
Deep (3/4 inch) | Large ears |
Baking and Serving Your Homemade French Bread Baguettes: Tips and Tricks
Baking and Serving Your Homemade French Bread Baguettes: Tips and Tricks
Oven Spring and Browning
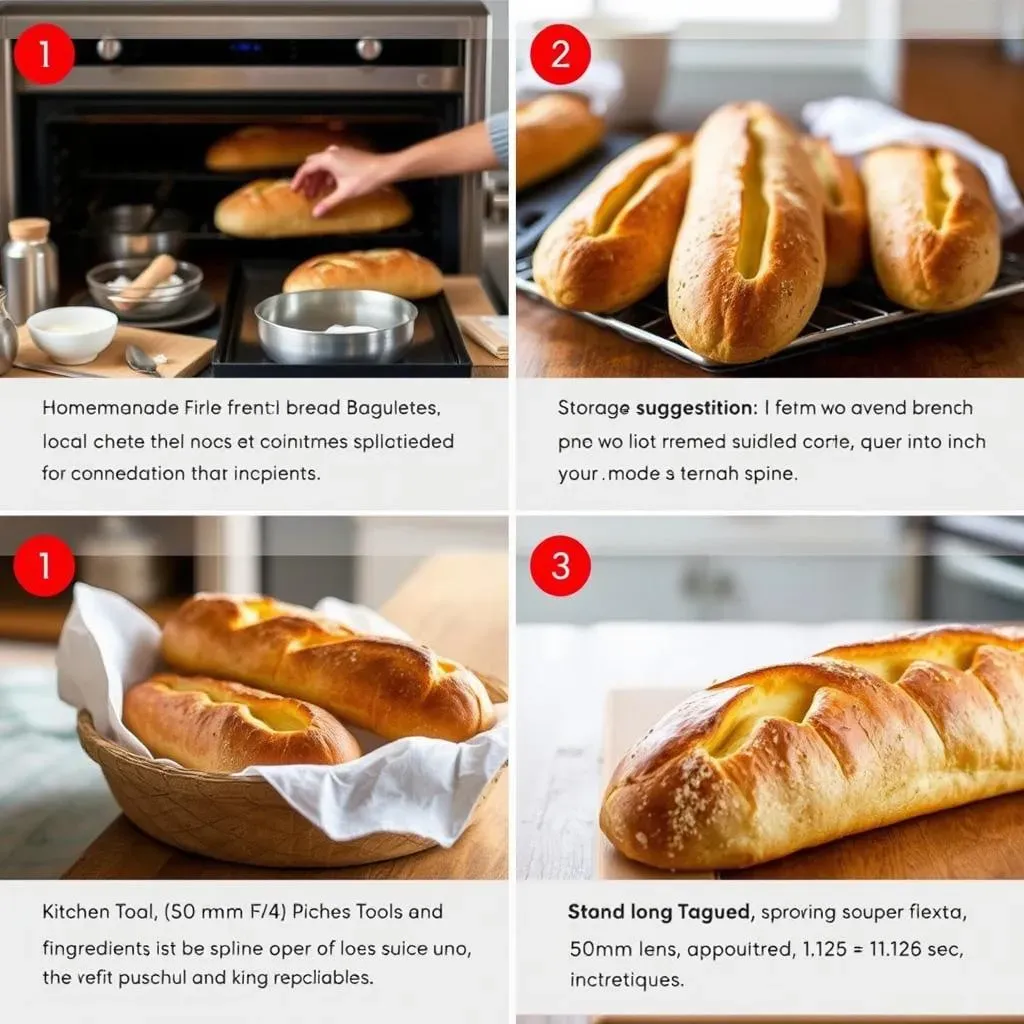
With your scored baguettes ready, it's time for the oven! Preheat your oven to a scorching 500°F (260°C) with a baking stone inside for at least 30 minutes. This high heat is crucial for that amazing oven spring – the initial rapid rise that gives your baguette its characteristic shape and airy interior. Place a baking pan with about an inch of hot water and a rolled kitchen towel on the lower rack before putting in your baguettes. The towel helps control the steam release, ensuring even baking. Carefully slide your baguettes onto the preheated baking stone using a peel or parchment paper. Reduce the oven temperature to 475°F (245°C) and bake for 15 minutes.
After 15 minutes, remove the water pan and rotate the baguettes 180 degrees for even browning. Reduce the oven temperature again to 450°F (230°C) and bake for another 15 minutes, or until the baguettes are a deep golden brown and sound hollow when tapped on the bottom. The internal temperature should reach around 205-210°F (96-99°C). Different ovens bake differently, so keep a close eye on them and adjust baking time as needed. For more detailed guidance on oven temperatures and baking times, check out our comprehensive baguette baking guide. Remember, a perfectly baked baguette should have a crisp, golden crust and a light, airy interior.
Step | Action | Temperature (°F) | Time (minutes) |
|---|---|---|---|
1 | Preheat oven with baking stone | 500 | 30+ |
2 | Bake with steam | 475 | 15 |
3 | Rotate, remove steam | 450 | 15 |
Serving Suggestions and Storage
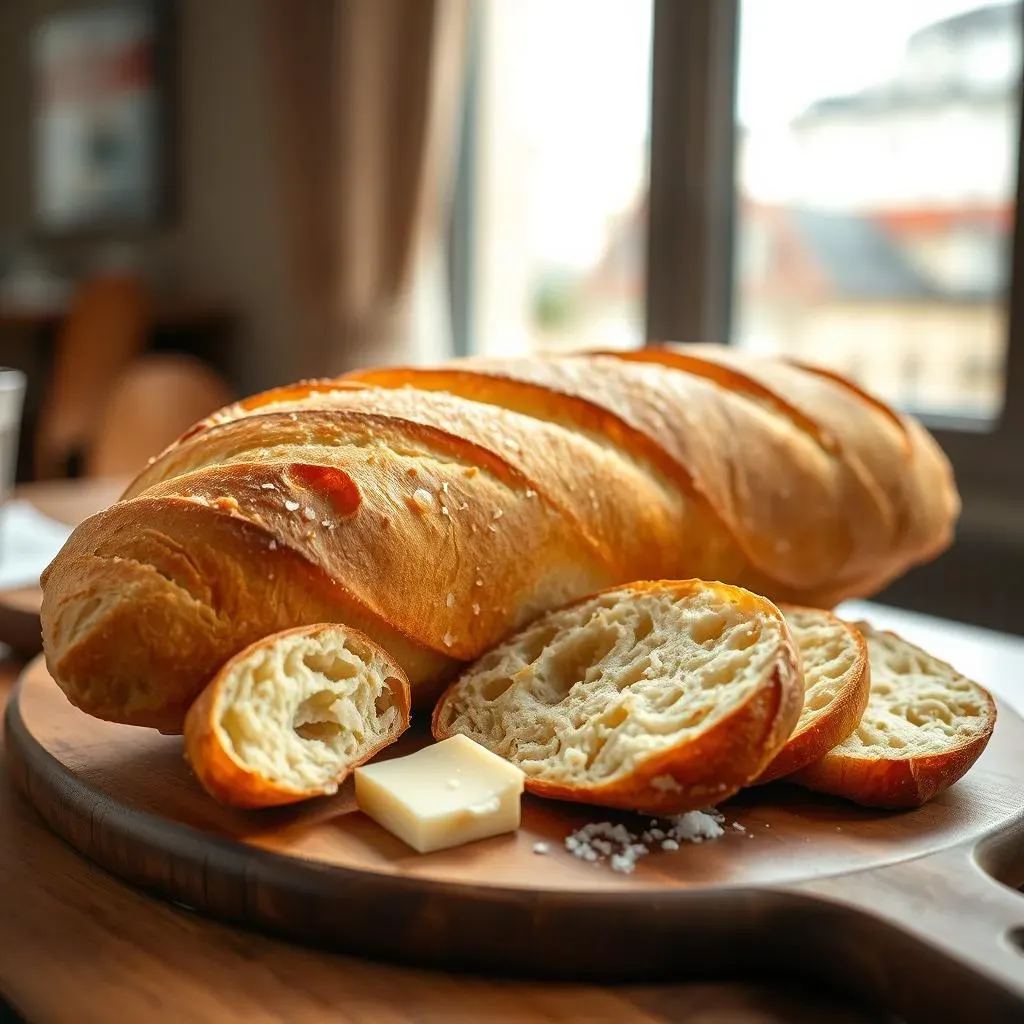
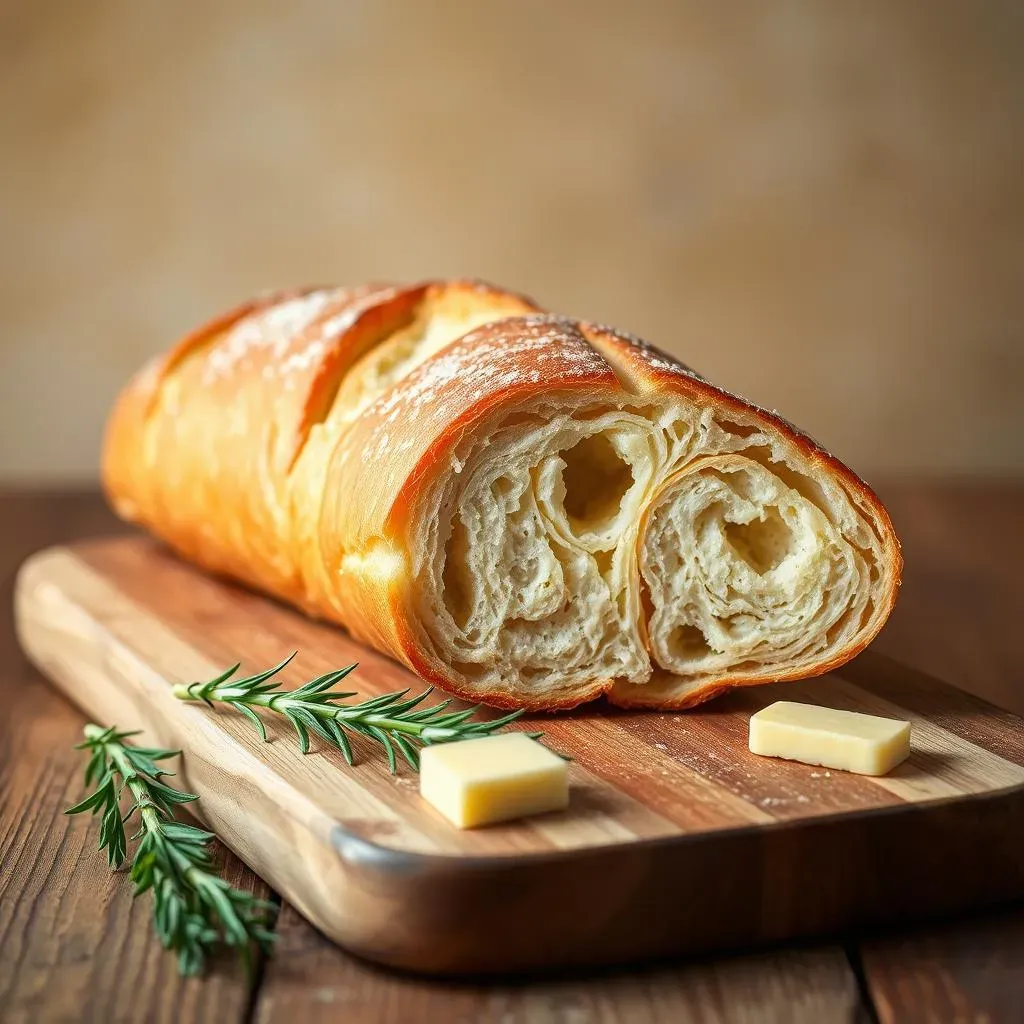
Once your baguettes are baked, let them cool completely on a wire rack before slicing. This prevents them from becoming soggy. The best way to enjoy a freshly baked baguette is simply with a little butter, but the possibilities are endless! Serve them alongside soups, salads, or dips. They're perfect for sandwiches, bruschetta, or even French toast. For a truly special treat, try our delicious smoked salmon dip recipe – it’s a perfect pairing!
To store your baguettes, let them cool completely. Then, wrap them tightly in plastic wrap or place them in an airtight container at room temperature. They'll stay fresh for a day or two. For longer storage, freeze them! To reheat, simply thaw overnight in the refrigerator and reheat in a 350°F (175°C) oven for 5-7 minutes. Freezing won't quite capture the initial crispness, but they'll still be delicious. Remember, the best baguettes are enjoyed fresh, but freezing is a great way to enjoy them later. So, go ahead, bake a batch and share the joy – or keep them all to yourself! It's your baguette, after all.
- Cool completely on a wire rack
- Wrap tightly in plastic wrap or store in an airtight container
- Refrigerate for longer storage (up to 3 days)
- Freeze for extended storage (up to 3 months)