
Table of Contents
Are you ready to unlock the secrets to baking the best French bread rolls? Forget those disappointing store-bought loaves – this article is your passport to perfectly crusty, melt-in-your-mouth goodness. We'll take you on a journey from the initial mixing of ingredients to the golden-brown perfection of the finished product. This isn't just another recipe; it's a comprehensive guide to mastering the art of French bread roll baking. We'll walk you through each step of the "best french bread rolls recipe," offering expert tips and tricks along the way. Discover how to troubleshoot common problems, explore delicious variations, and even uncover creative ways to use your freshly baked rolls. Whether you're a seasoned baker or a complete novice, this guide ensures you'll achieve bakery-quality results in your own kitchen. Get ready to impress your friends and family with your newfound baking prowess!
Mastering the Best French Bread Rolls Recipe: A StepbyStep Guide

Mastering the Best French Bread Rolls Recipe: A StepbyStep Guide
Getting Started: Ingredients and Equipment
Let's dive right in! First, gather your ingredients. You'll need warm water (around 105-115°F), active dry yeast, sugar, a touch of salt, some olive oil (or melted butter for extra richness!), and all-purpose flour. Don't forget a large mixing bowl, a sturdy spatula or wooden spoon, and some plastic wrap or a clean kitchen towel for the first rise. Having a stand mixer isn't strictly necessary, but it makes kneading a breeze.
The magic begins with activating the yeast. In your mixing bowl, combine the warm water, yeast, and a pinch of sugar. Let it sit for about 5-10 minutes until it gets foamy and bubbly. This shows the yeast is alive and ready to work its magic, transforming your simple ingredients into delicious rolls.
Ingredient | Quantity (Approximate) | Notes |
|---|---|---|
Warm Water | 1 cup | Temperature is crucial for yeast activation |
Active Dry Yeast | 2 1/4 teaspoons | Check expiration date for best results |
Sugar | 1 tablespoon | Feeds the yeast |
Salt | 1 teaspoon | Enhances flavor and controls yeast activity |
Olive Oil/Melted Butter | 2 tablespoons | Adds richness and tenderness |
All-Purpose Flour | 3-3 1/2 cups | Add gradually until dough is smooth and slightly sticky |
Kneading and First Rise: The Patience Pays Off
Once your yeast mixture is bubbly, add the remaining ingredients (salt, oil, and about 2 cups of flour). Stir until a shaggy dough forms. Now comes the kneading! This is where you get to build some serious arm muscles (or use that stand mixer!). Knead for 8-10 minutes until the dough is smooth and elastic. It should be slightly sticky, but not overly so. If it's too sticky, add a little more flour, a tablespoon at a time.
After kneading, place the dough in a lightly oiled bowl, turning to coat. Cover with plastic wrap or a clean kitchen towel and let it rise in a warm place for about 1-1.5 hours, or until doubled in size. Patience is key here! The longer rise allows for the development of flavor and texture. A warm oven (turned off) is a great place for a rise.
- Proper kneading develops gluten, resulting in a chewier, more satisfying roll.
- Don't be afraid to get your hands a little messy during kneading!
- The rise time may vary depending on the temperature of your environment.
Tips and Tricks for Perfect French Bread Rolls: Troubleshooting and Variations
Tips and Tricks for Perfect French Bread Rolls: Troubleshooting and Variations
Shaping and Baking: The Final Flourishes
Once your dough has doubled, gently punch it down to release the air. Divide it into equal-sized pieces (about 2 ounces each for standard rolls). Shape each piece into a smooth ball, tucking the edges underneath. Place the rolls onto a baking sheet lined with parchment paper, leaving a little space between each one for expansion. Let them rise again for another 30-45 minutes, covered, until puffy.
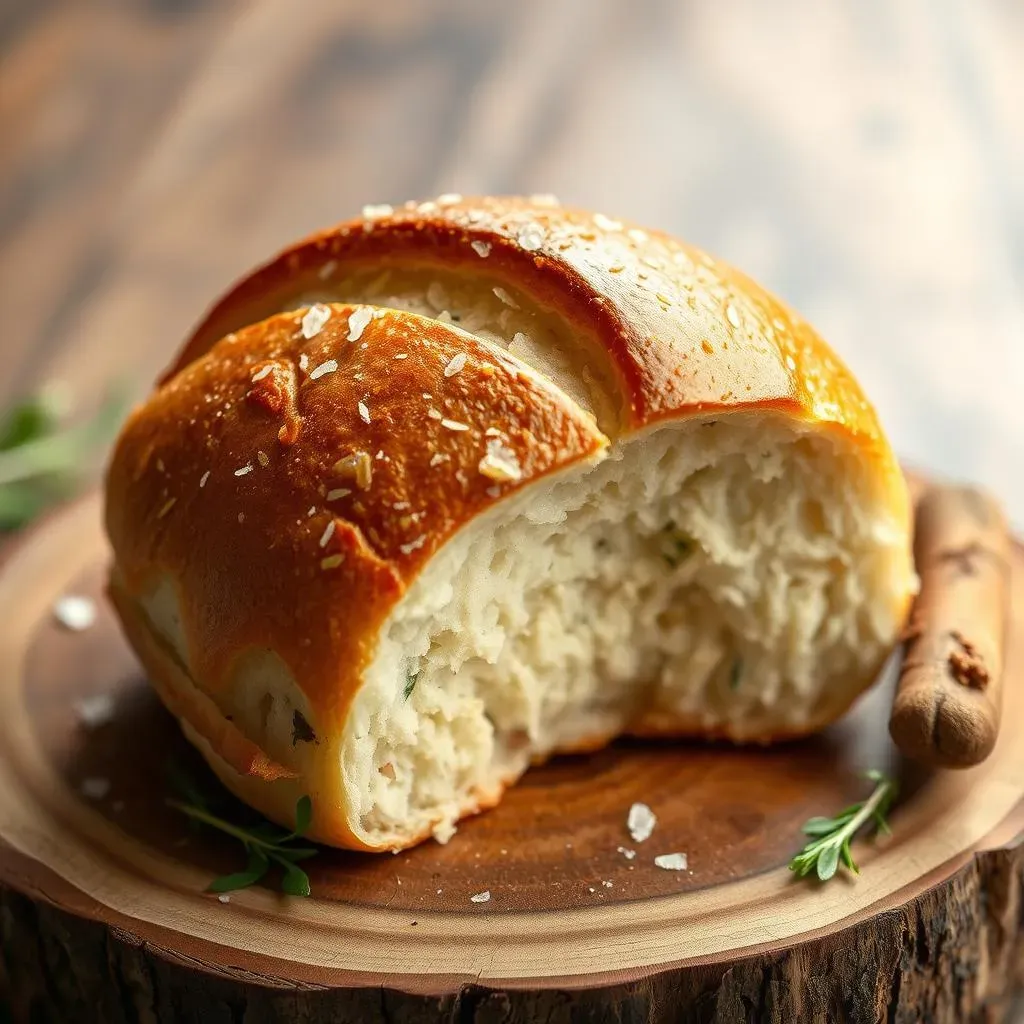
Preheat your oven to 375°F (190°C). Before baking, you can brush the tops of the rolls with a little milk or egg wash for a beautiful golden-brown crust. Bake for 15-20 minutes, or until they're deeply golden brown and sound hollow when tapped on the bottom. Resist the urge to open the oven door too early; this can cause the rolls to collapse.
- For extra flavor, add herbs or spices to the dough.
- Experiment with different shapes, such as crescent rolls or braided rolls.
- For a softer crust, reduce baking time slightly.
Troubleshooting and Variations: Conquering Common Challenges
Baking is a science, but sometimes things don't go exactly as planned. If your rolls are too dense, you might not have kneaded the dough enough, or the yeast could have been old or inactive. If they're too dry, you might have overbaked them. Experiment with adjusting baking times and adding a little more moisture to the dough next time. On the other hand, if your rolls are too sticky, you likely didn't add enough flour during kneading. Don’t worry—even experienced bakers have their occasional mishaps!
Want to add a twist? Try adding different ingredients to your dough, such as herbs (rosemary, thyme), cheese (cheddar, parmesan), or even some chopped nuts (walnuts, pecans). For a healthier option, substitute a portion of the all-purpose flour with whole wheat flour. You can also experiment with different types of oil, like coconut oil or avocado oil. The possibilities are endless! Remember, baking is all about experimentation and finding what works best for you.
Problem | Possible Cause | Solution |
|---|---|---|
Dense Rolls | Insufficient kneading, old yeast | Knead longer, use fresh yeast |
Dry Rolls | Overbaking | Reduce baking time |
Sticky Rolls | Not enough flour | Add more flour during kneading |
Beyond the Basics: Creative Uses for Your Best French Bread Rolls Recipe
Beyond the Basics: Creative Uses for Your Best French Bread Rolls Recipe
Beyond the Basics: Gourmet Sandwiches and More
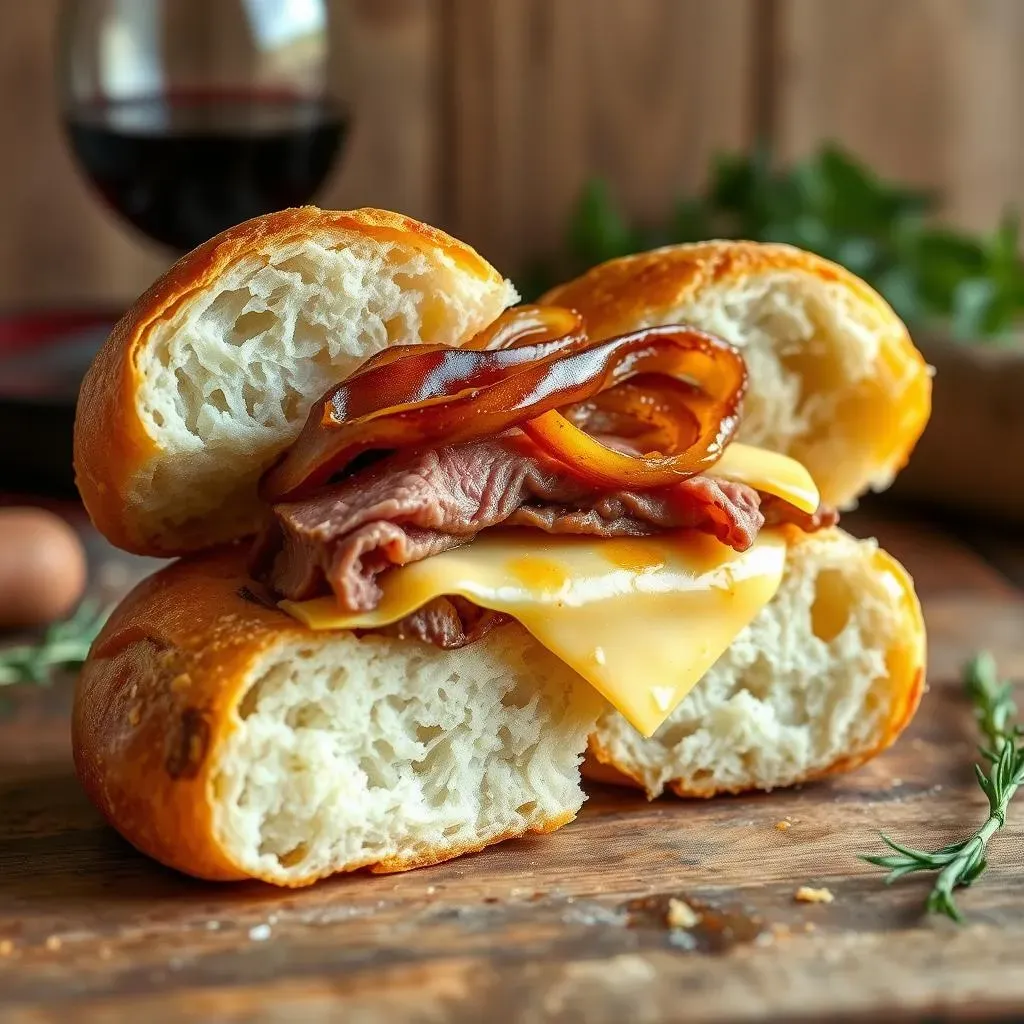
Let's face it: the most obvious use for these amazing rolls is creating incredible sandwiches. Forget sad, soggy bread; these rolls provide the perfect sturdy base for anything from classic ham and cheese to gourmet creations. Think roasted turkey with cranberry sauce and brie, or spicy Italian meats with fresh mozzarella and pesto. The slightly crisp exterior and soft interior provide a delightful textural contrast that elevates any sandwich to the next level. The possibilities are truly endless, limited only by your imagination (and perhaps your fridge's contents!).
Consider experimenting with different fillings to discover your favorites. A simple buttered roll is amazing, but add some gourmet ingredients, and you've got something special. Don't be afraid to get creative! Think about using unique spreads, interesting cheeses, and fresh, seasonal ingredients.
Sandwich Filling Idea | Cheese Pairing | Extra Touches |
|---|---|---|
Roast Beef & Horseradish | Sharp Cheddar | Caramelized Onions |
Grilled Chicken & Avocado | Monterey Jack | Bacon, Tomato |
Smoked Salmon & Cream Cheese | Cream Cheese (duh!) | Capers, Red Onion |
Sweet Treats and Savory Sides: Expanding Your Horizons
But wait, there's more! These versatile rolls aren't just for savory dishes. Their slightly sweet flavor profile makes them a delightful base for sweet treats, too. Imagine them filled with warm cinnamon sugar, or transformed into miniature bread pudding. Their sturdy structure also makes them perfect for dipping into soups or stews, offering a delicious and satisfying contrast of textures and flavors. They're a fantastic vessel for a variety of dips, from creamy hummus to spicy salsa.
Don't underestimate the power of a simple, perfectly baked roll alongside a hearty meal. Their versatility makes them suitable for any occasion, from casual weeknight dinners to elegant holiday feasts. These rolls are the unsung heroes of the dining table, adding a touch of homemade charm and deliciousness to any spread. And let's be honest, who doesn't love a warm, buttery roll?
- Garlic knots: Brush with garlic butter and bake until golden.
- Bread pudding: Cube the rolls, soak in custard, and bake.
- Croutons: Cube and toast for a crunchy salad topping.
Make-Ahead Magic: Freezing for Future Feasts
One of the best things about these rolls? They freeze beautifully! Bake a large batch, let them cool completely, and then store them in a freezer-safe bag or container for up to three months. When you're ready for a quick and easy meal, simply pop a few rolls in the oven to reheat. They'll taste almost as good as fresh, and you'll have a delicious, homemade treat ready in minutes. This is perfect for busy weeknights or when you want to enjoy the taste of freshly baked bread without the fuss.
This make-ahead convenience is a game-changer for busy individuals or families. Imagine having a stash of these delicious rolls readily available whenever you need them. No more last-minute trips to the bakery or settling for subpar store-bought options. With a little planning, you can always have a supply of these amazing rolls on hand, ready to elevate your meals and impress your guests.